26
1
submitted 7 months ago by [email protected] to c/[email protected]

Universal holder for any cordless drills and tools. I used it mainly for Makita, but other power tools should fit as well of course. The following Makita tools have been tested so far in the 40mm version: Makita DTD171 Makita DDF484 Makita DDF484B Makita DHP484 Makita DDF459 Makita DHP481 Makita DTW300 Makita DTW302 Makita DHG180 Makita DHG181 Festool T18+3 Milwaukee 2553 M12 Fuel ** Milwaukee 2504 M12 Fuel ** DeWalt DCE530 ** DeWalt DCD771 ** (seems also to fit in 35mm) DeWalt DCF887 ** (seems also to fit in 35mm) DeWalt DCF885 ** (seems also to fit in 35mm) DeWalt DCD985 ** Surebonder Ultra DT-3100FAMZS ** Porter Cable PCC601 Porter Cable PCC641 The 35mm version fits good for: Makita DDF487 Makita DHP487 DeWalt DCD778 ** The wide version fits: Makita DWT700 ** Makita DWT701 ** Ryobi PBLIW01 ** Smaller tools will probably better fit in the smaller holder with a 35mm cut-out. If someone needs a different measurement, feel free to leave a comment, I'll see if I can implement this. Printing Very easy, no supports needed if printed standing. I used PETG for my prints and three walls with 20% infill. This is very solid. If you want, you can print it with 100% infill and get it even stiffer. But you will need ~220g of filament for this. ;) Update 04.05.2023 I've added another design for the holder, based on the idea of @mnemic. I has the same sizes as the other, but saves even more filament. Update 06.10.2023 I've added a wider version of the holder, for Tools like the DWT700 or DWT701. This version is identical to the 40mm default version. Only difference is, that that the inner width is 81mm instead of 70mm. ** = Information from users who printed the models.

27
2
submitted 7 months ago by [email protected] to c/[email protected]

Whipped up this quick wall mounted spool holder. made to accommodate 1.1kg spools and under at 100% scale and should accommodate 3kgs by just upscaling. feel free to remix and repost all I ask for is oc credit.

28
3
submitted 7 months ago by [email protected] to c/[email protected]
29
2
submitted 7 months ago by [email protected] to c/[email protected]

Update 2023-11-27: This thing is Version 1 of my adaper. I have now designed Version 2, with the following improvements: the smartphone's center of gravity is now directly above the mounting screw, which gives the tripod a more secure stand, The tripod adapter is now even more compact and lighter. You can download this new version 2 for free here or here. Summary (Version 1) This compact tripod mount can hold almost all smartphones with its clamping range of 64 to 84 mm. It can easily be printed as a single part (“print-in-place”). No other components are required other than a rubber band. For smartphones with slippery sides without a case, self-adhesive silicone bumpers can optionally be glued in. Printing Instructions: Use a 0.4mm line with a layer height of 0.2mm. Print the object in the specified orientation. If possible, place the Z-seam as shown in the image above. There are two print files, with 0.3mm clearance and with 0.25mm clearance ("...tight-fit"). If your printer prints precisely, I would use the latter. Assembly Instructions: Before using the adapter, the assembly of one or two rubber bands is required. Using two rubber bands instead of a single one can increase safety. Smartphones with silicone cases usually hold well. For smartphones with slippery sides without a case, recesses have been provided into which optionally cut self-adhesive silicone bumpers with a thickness of 2 mm and an edge length of 7 mm can be glued (see pictures above). Instructions for Use: Before inserting the smartphone, please check whether the rubber band(s) are still intact. The smartphone could fall out if the rubber band(s) break. The adapter has a printed thread to accept the mounting screw. The screw hole is 11mm deep. If your tripod has a removable lock nut on the mounting screw, you can remove this nut and thus increase the usable thread length of the screw. This increases stability. See picture above. The printed thread can wear out. Check the screw connection for tightness.

30
1
MicroSD case by M0les (www.thingiverse.com)
submitted 7 months ago by [email protected] to c/[email protected]

This is a fully re-modeled build of a MicroSD case inspired by Kozalakis's one, borrowing some ideas from Kroki's remix of it. I didn't actually use any of their source, rather building from scratch using SD/MicroSD card dimensions. This version relies on fairly close tolerances, so it may be a bit temperamental on some 3D printers (Details below). The main differences from the other two: The case holds 10 MicroSD cards (2 x 5) There are registration tabs in the slots, so the SD adapter lid should only go in with the label side out and the connectors on the inside of the box. The SD adapter should register with the card retention tab on the inside of the slot (The original design used the write-protect tab slot to register the card). Depending on the material used and tolerances, this may be tight or wear out after a while. The SD adapter can be pushed-out from the connector end (the main reason for Kroki's remix). The model is intended to be printed with the notched “connector end” of the case DOWN. The print should not need any supports as all overhangs are either short (i.e. inside the MicroSD slots) or gradually sloping (the inside-top of the box). I added a second version that has added 0.2mm thick “frog toe” sprues on the outer corners of the base. These may assist with bed adhesion and preventing curling during the print. The sprues are more easily removable than a conventional brim addition and use less material too. This was all done using a free OnShape account and the model source is here

31
6
Corner bracket by Neuralhub (www.thingiverse.com)
submitted 7 months ago by [email protected] to c/[email protected]

This is a strong corner for fixing three planes. Print as in the screenshot. Added a new v2.1 version! The area of contact with the planes has been increased by adding small overhangs that do not affect the print quality. Added a new v2 version! Removed overhangs for simpler print quality. Increased base area for better adhesion.

32
1
submitted 7 months ago by [email protected] to c/[email protected]

Similar tools are sold online, pretending to help creating friendship bracelets. I was curious, so I created one for my daughter. Even not really needed it helps to keep the right order of the strings, which helps the younger ones... You should still attach the initial end of the strings somewhere so you can give some tension on the strings... Due to the thread this required 0.2mm when I printed it... Have fun!

33
1
submitted 7 months ago by [email protected] to c/[email protected]

CyberLevel. It’s a digital spirit level for camera operators with a circular touchscreen, some Lemo connectors on the other side and a 1/4-20 thread of the back (aluminum gear set insert, much lighter) . Printed on my 6 years old HyperCube Evolution in CF PETG.

34
1
submitted 7 months ago by [email protected] to c/[email protected]

It helps categorise, manage, and present content effectively, commonly found in applications. About 130mm in width x 30mm in height. An add-on is an optional component, feature, or extension that can be integrated into an existing system. More designs on Printables: https://www.printables.com/@ChrisTech Change Log: 7 November 2023 Create an extension part to link with another partition. 15 November 2023 Fine-tuned the design's tolerance.

35
1
submitted 8 months ago by [email protected] to c/[email protected]
36
1
submitted 8 months ago by [email protected] to c/[email protected]

File here. This is almost definitely not the best one that anyone's designed, but at least it's a little unique!

The holder parts bend apart to snap brushes in and out, and there's a little shelf above to put your toothpaste on. The shelf has print-in-place hinges so you can print the whole thing flat with no support and it all works with no assembly.

37
3
submitted 8 months ago by [email protected] to c/[email protected]
38
2
Open Source Orbital Shaker (assets.pxlmo.com)
submitted 8 months ago by [email protected] to c/[email protected]

We put this together for my public library's makerspace. I have a bunch of issues with the design, but it does work so what can I say really. Specifically it's this one.

Patrons can use it for whatever they want, i.e. melting dissolvable supports faster, culturing bacteria, etc.

39
2
submitted 8 months ago by [email protected] to c/[email protected]

Redesign of a simple micro SD card organizer, based on the original MicroSD Card holder by FritoBandito. Created a new model in Autodesk Fusion 360. Redesigned the slots for easier card removal. Print with 0.2mm layer height

40
2
Meta Quest 3 Wall Mount by 10P6 (www.thingiverse.com)
submitted 8 months ago by [email protected] to c/[email protected]

This is a wall mount I designed and made for the Meta Quest 3 VR Headset; I also made a wall mounts for the Quest 1 and 2 when they were released, (see other designs) and was hoping to have this wall mount compatible with the Quest 1 and 2, but the design of the Quest 3 prohibits that. I have added three new STL files to make printing easier, one is a top part, and the other a bottom part, the other is a skinny top to fit on tiny printer bed; see in print section below. Like my other Quest wall mounts, this works well, but please be gentle with it as any damage to your headset is on you. I designed this to mount to a wall STUD with sheet rock / dry wall screws; (You can use on Wood piece or wall with the correct anchors MAKE SURE YOU DO NOT SCREW INTO A CABLE OR PIPE OF SOME KIND. IF YOU ARE NOT 100 PERCENT SURE WHAT TO DO, GET HELP INSTALLING THIS The hook on the bottom is hold the USB C cable when the unit is not being charged. Also, please checkout and subscribe to my youtube channel, youtube.com/10p6 **** I have changed the license agreement for this model to allow remixes and sales.. The rules: 1 - Keep the 10p6 Logo (if you do not like it, do not do a remix), 2 - DO NOT USE THE META LOGO AT ALL (That is a registered trademark and I do not want it on my models / remixes.) 3 - Make sure you list and link your remix to this model here on Thingiverse and nowhere else; (This is my model you are altering, not a model you are creating.) 4 - If I find my model files or remixes of it on any other site I will have them removed. I have also allowed my model to be 'Printed' and sold online. Note that credit for any sale listing must show the model was designed by 10P6 and must not be made to look like you designed it. You are responsible for the quality of the prints, and any design changes made as I know my model works perfectly. DO NOT REMOVE THE 10P6 LOGO. THESE MODIFIED LICENSES DO NOT ALLOW FOR THE ELECTRONIC DESIGN FILE/s, OR REMIXES TO BE SOLD OR SHARED ON ANY SITES OTHER THAN THINGIVERSE. MY PHYSICALLY PRINTED MODEL AND YOUR REMIXES CAN BE SOLD ON OTHER SITES, HOWEVER DO NOT SELL ANY MODELS / REMIXES EITHER DIGITAL OR PRINTED ON CULTS3D AS THE OWNER THINKS COPYRIGHT THEFT IS OK WHICH IT IS NOT. ****

41
2
submitted 8 months ago by [email protected] to c/[email protected]

This is an automatically latching lock which is powered by a Micro Servo SG90 9G. This makes it easy and inexpensive to interface to most microcontrollers such as Arduino. It is designed to engage with a pin of 3mm to 4mm diameter (not part of this model). When the pin enters the slot, it causes the mechanism to latch. To unlock it, the servo is driven through a range of 45 degrees, which causes the lock to release. The mechanism is designed to have a large mechanical advantage, so it should be able to cope with quite a bit of load without stalling the servo motor. We are approaching Halloween as I write this, so perhaps you could use it to drop giant spiders on unsuspecting guests :) You will also need: 2x 3mm x 15mm brass shaft (or similar) 2x M3 x 15mm screws to secure the housing 2x small springs Grease Use a drill to clean up the holes in the moving parts, so that they rotate very freely on the shafts. File or sand the parts to ensure they are smooth, and apply grease before assembly. Test the range of motion of the servo before assembly. You can actually test the complete mechanism is working well without the servo fitted. Push a screwdriver into the slot to make it latch, then use your fingertip to actuate the trigger. When you are confident that is operating smoothly, connect the servo to your Arduino (or whatever) to find its "rest" or "zero" position, then fit the servo horn in the correct orientation, then mount the servo and test in situ. I've attached a picture showing a view of the upper part of the housing viewed from below to show the proper orientation of the servo horn when the servo is at its "rest" or "zero" position. When the servo is driven through 45 degrees, it pushes against the "trigger" (the red part) causing the latch to release. Sample Arduino code is included (example.ino), showing how to drive the servo.

42
2
submitted 8 months ago by [email protected] to c/[email protected]

I was just playing around with printable trapezoidal threads and before I realized it, I had designed a large machine vise… The vise has a clamping range of 120x120mm. It is good for circuit boards because plastic is non-conductive. Standard trapezoidal threads (30° thread angle ) or ACME threads (29° thread angle) are very difficult to print in an upright position. The overhangs are not supported by the thread geometry. Therefore my thread has a thread angle of 42°. This can be printed upright at 0.12 layer height without using supports. Print all threaded parts in an upright position with a layer height of 0.12mm or smaller. All other parts can be printed with 0.2mm or bigger layers. Support is needed for the Slider and the Jaws. For the Base support is optional but recommended. The other parts do not need supports. I am using 4 walls, 5 tops, 4 bottoms and 10% gyroid infill. See my 3mf file for more details and change it to your needs. The 3mf file is for Bambu Lab P1/X1 printer but shows the orientation of the parts. Just to mention it - this is a large vice. It needs more than 0.5kg filament. The gap between the parts is 0.25mm for all movable elements. The pins have a smaller clearance (0.15mm) as those are a press-fit. If necessary they can be hammered in position. I was using some very cheap filaments that had large tolerances in diameter. In that case you might need to rework the holes for the pins with a drill (Ø4mm) and sand the sliding surfaces evenly. This should not be necessary if you use quality filament. For the sliding surfaces and the thread I am applying candle wax as surface treatment (just rub it on). Then you have a nice and smooth vice action.

43
7
Chain Oiler by Nussss (www.thingiverse.com)
submitted 9 months ago by [email protected] to c/[email protected]

Guide for lubricating motorcycle chains. Clips onto grease bomb Maximum chain width: 26mm Guide pour graisser les chaines de motos. Se clipse sur les bombes de graisse aerosol Largeur maximum de la chaine : 26mm Je peux faire d'autres versions plus larges ou plus étroites si besoin.

44
3
submitted 9 months ago by [email protected] to c/[email protected]

A simple spring loaded third hand for soldering wires

45
3
Garage Shelf Hook by 5tuff (www.thingiverse.com)
submitted 9 months ago by [email protected] to c/[email protected]

Hook to hang stuff from on the garage shelves from Bunnings or where ever These have lasted me over a year. Printed versions in PLA or PETG on X1C & Ender3 both are fine for hanging tools. Working on shelves with holes of about 12mm upper hole, 7mm lower hole and 1mm metal thickness.

46
1
submitted 9 months ago by [email protected] to c/[email protected]

Some holders or adapters I made moons ago.

47
4
submitted 9 months ago by [email protected] to c/[email protected]

This was remixed from UncleFrankSays version to hold a different brand of electrical tape which had a different inner diameter. If you read his comments on the serration, it's really only cosmetic as it doesn't function very well because electrical tape doesn't tear well. What is nice about this, however, is that it gives you a place to hold the tape while pulling it until it snaps. This means that most of the stretch is on the dispensed piece and not back on the roll. If nothing else, the feature allows for you to more quickly pull the next piece rather than letting it stick back on the roll. Amazon Link: https://www.amazon.com/Duck-282289-Electrical-4-Inch-Single/dp/B007JSGNVQ?ref_=ast_sto_dp&th=1 Let me know if the comments if there's interest for other dimensions. Depending on feedback, I may make the design parametric within Fusion 360.

48
3
submitted 9 months ago by [email protected] to c/[email protected]

This is a variation of my 3 PIN LED Strip thing 6123191. This is for 12v 10mm LED strip lights. The height is 4mm so it doesn't add height to the height of my pictured IP65 strip. Yes, it's not soldered but you can see the wires fit. 9/20/2023 Update: Added info that this is a Remix of https://www.thingiverse.com/thing:5223739

49
3
submitted 9 months ago* (last edited 9 months ago) by [email protected] to c/[email protected]

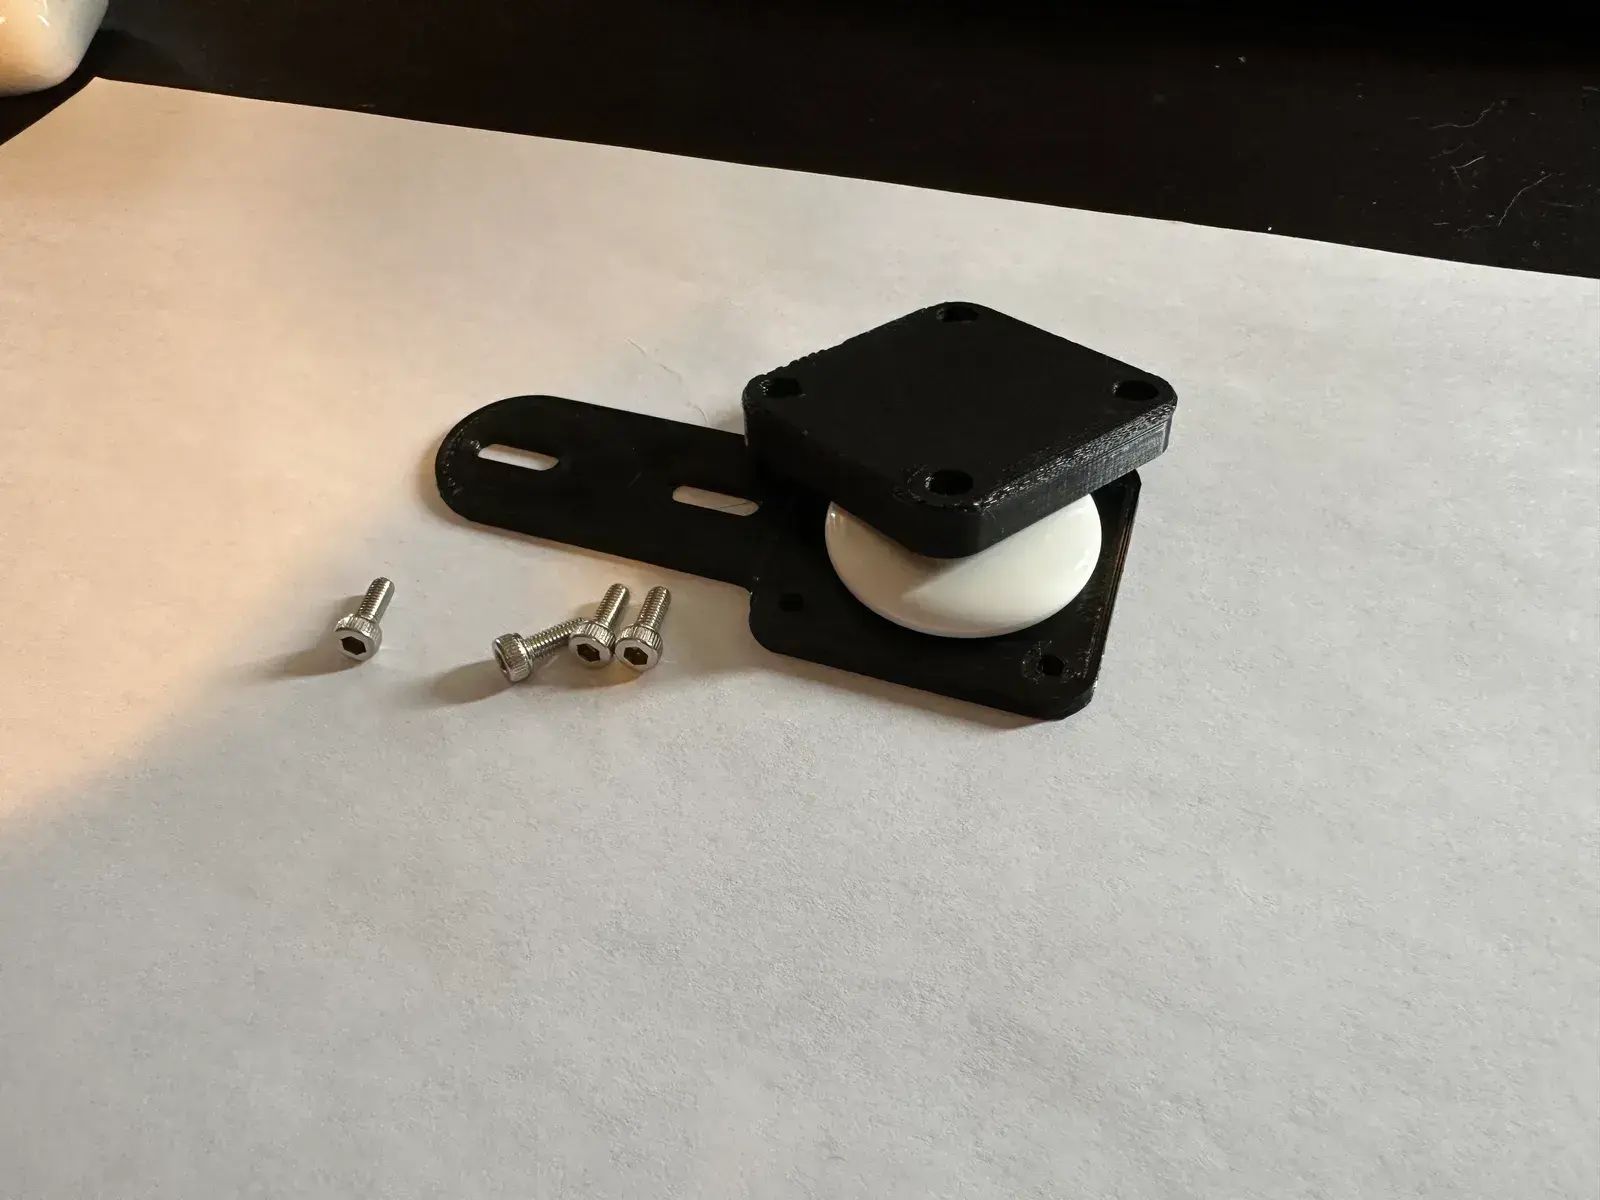
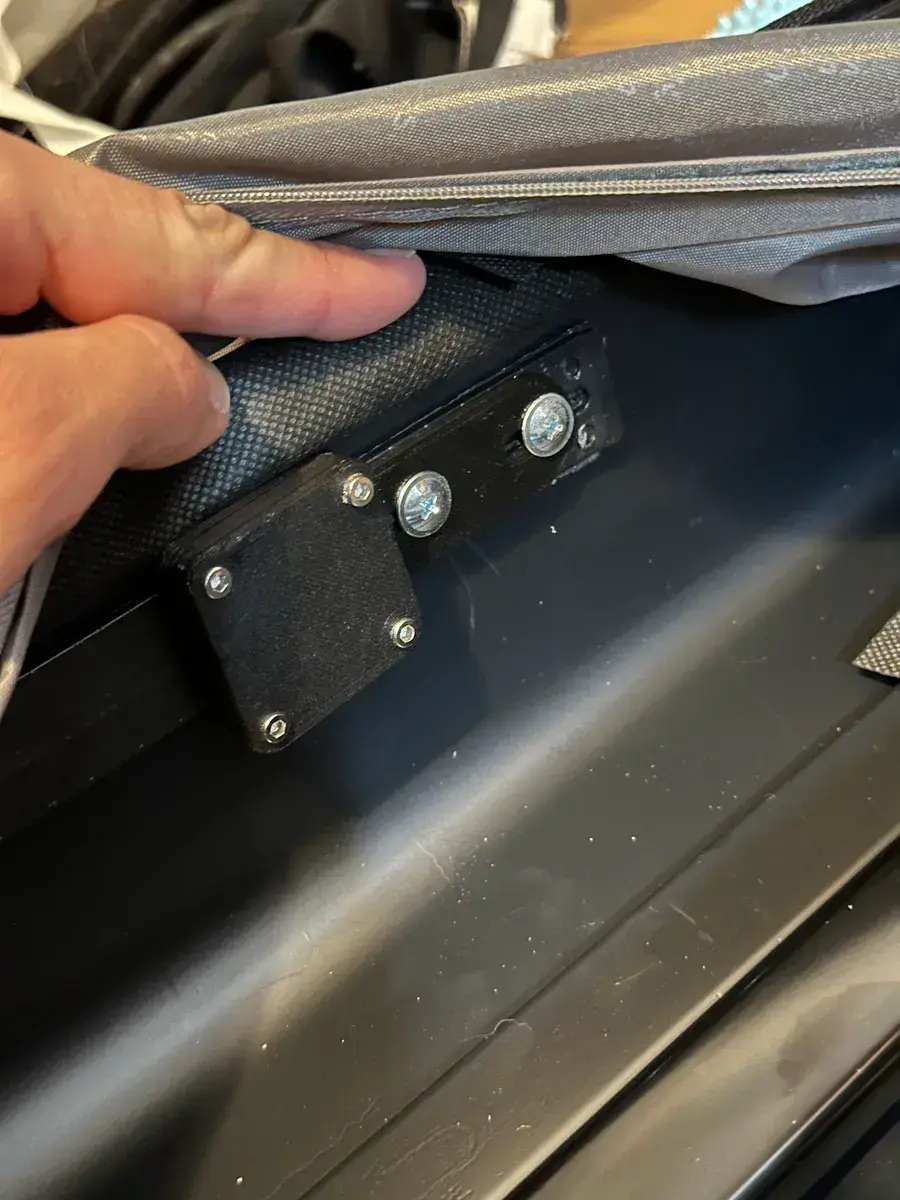
If you unzip the fabric lining of your suitcase, there should be some screws that attach the handle to the outside. This will commandeer one of those screws to hide the AirTag beneath the fabric lining (but close to the exterior shell of your luggage). Mine is a Samsonite, but I'm sure it works for others as well!

The holder itself

In situ

50
6
submitted 9 months ago by [email protected] to c/[email protected]

Design by @canthidium

view more: ‹ prev next ›

Functional 3D Printing

18 readers
1 users here now

Welcome fellow prototypers! This communities' purpose is to help others and share functional 3D Printing related information. While other 3D Printing Communities are a good resource, sometimes too many help posts get buried under memes and fluff. This will remain technically focused and keep the fluff removed. Please help your fellow 3D Printer hobbyists as much as you can with their issues! and showcase your functional prints and how you use or created them.

founded 1 year ago