Functional 3D Printing

18 readers
1 users here now

Welcome fellow prototypers! This communities' purpose is to help others and share functional 3D Printing related information. While other 3D Printing Communities are a good resource, sometimes too many help posts get buried under memes and fluff. This will remain technically focused and keep the fluff removed. Please help your fellow 3D Printer hobbyists as much as you can with their issues! and showcase your functional prints and how you use or created them.

founded 1 year ago
51


SkyWatcher Star Adventurer is my grab and go kit for astronomy and I take it with me abroad too. I dont want to carry around steel counterweight when Im abroad, especially air travel with them can be costly. So I came up with this solution that holds two 0.5l cans to use as counterweight. On the V2 Ive also included screws and fitting threads unlike in the photo of the V1 with metal bolts and nuts.

52


Various knobs for cylinder head screws with M3/M4/M6 or M8 thread. For explanation, I have designed two different versions. The standard version has a hexagon socket integrated in the knob. The screw is inserted or glued onto this, whereby the thread length of the screw remains the same. The "thread" - version is for high stress when turning with a very large torque. For this purpose, the screw is screwed into the knob and glued in place. This shortens the screw by approx. 5 mm, but the connection is extremely strong and resilient.

53


Simple hooks on bracket designed to fit on VW T5. may fit other VWs can be printed on FDM or resin (I would advise a thicker wall with good drainage if resin, a solid print will not endure well)

54


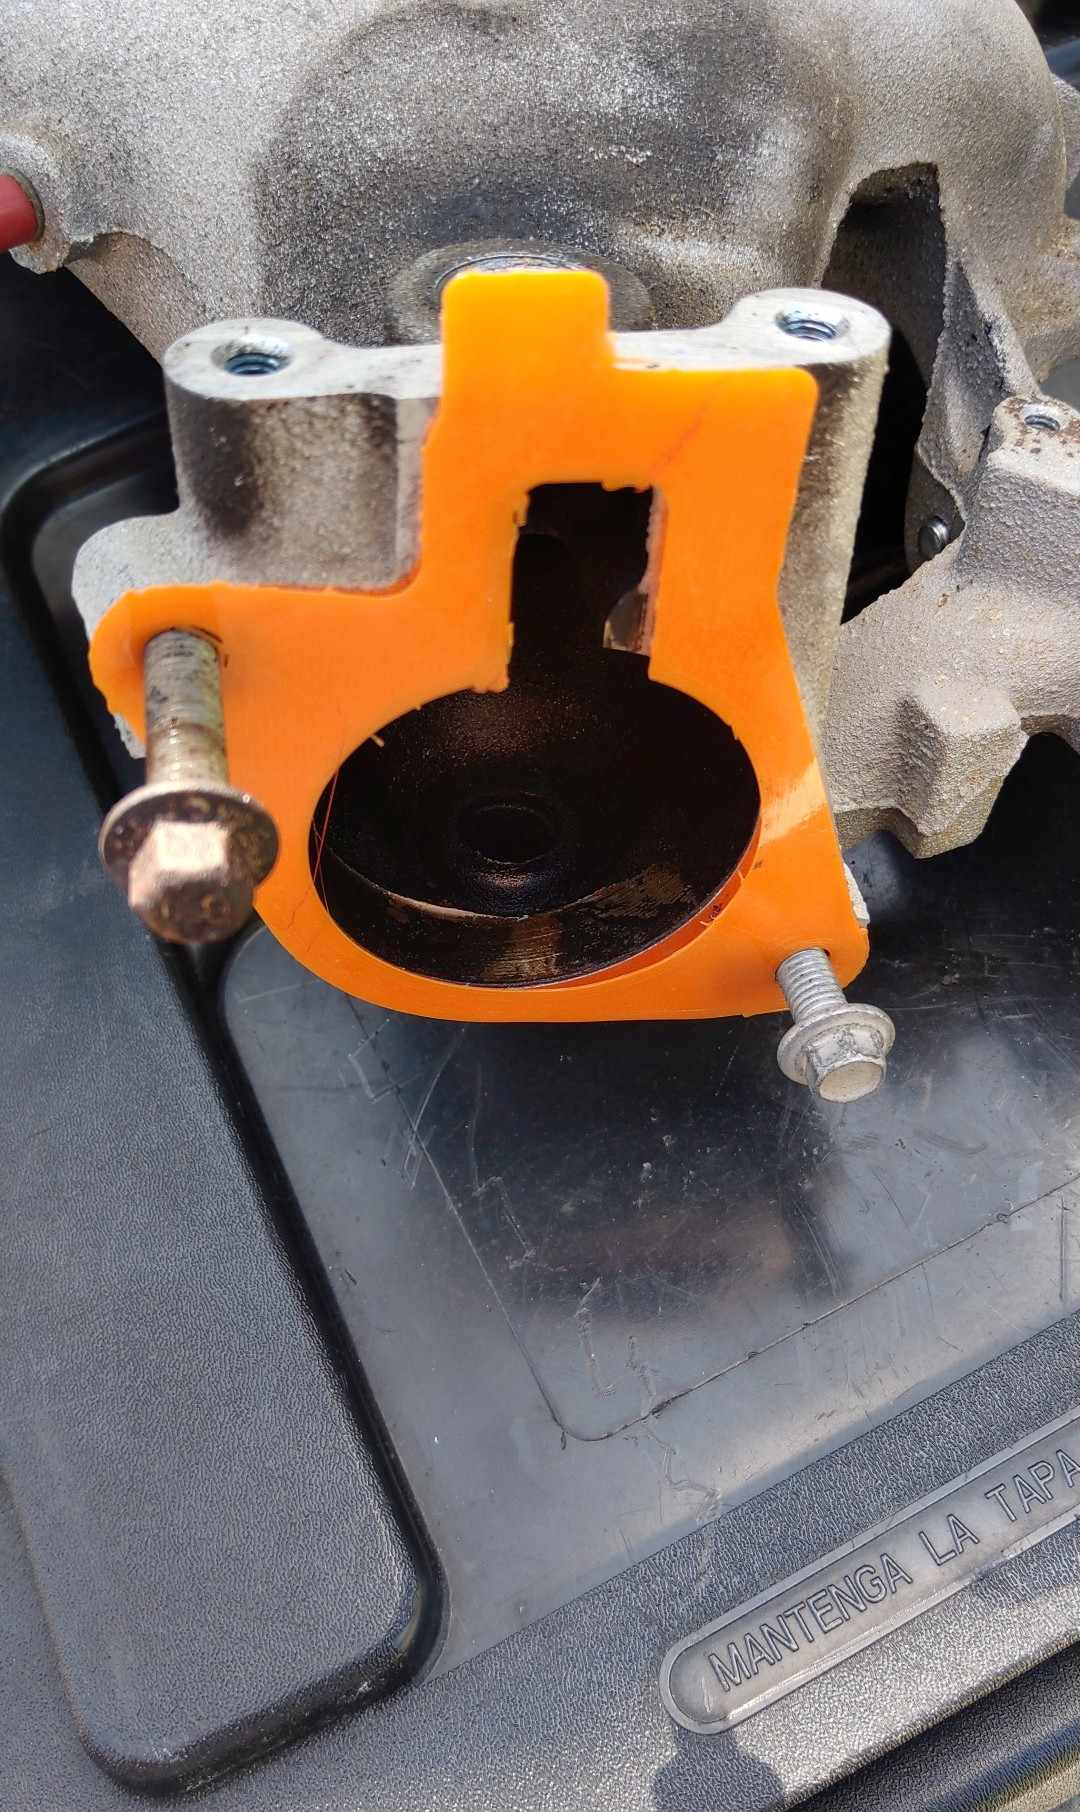
Swapping out a broken intake manifold and needed to replace my throttle body gasket. Printed in orange TPU because that's what I had on hand.

55


Paint mixer model 2 The hole is 8mm with tolerance already applied. If you are interested in supporting my work and possibly having access to the original STEP file of this model, you can receive it with a small donation. The donation is voluntary, but any contribution is appreciated. Thank you for your support!

56


My most complex model to date, can be configured with as many tasks as you want.

57


Door mounted container for sauce/gravy packets. Approx. 1.5in deep. Use a single 5lbs capacity command strip to mount.

58


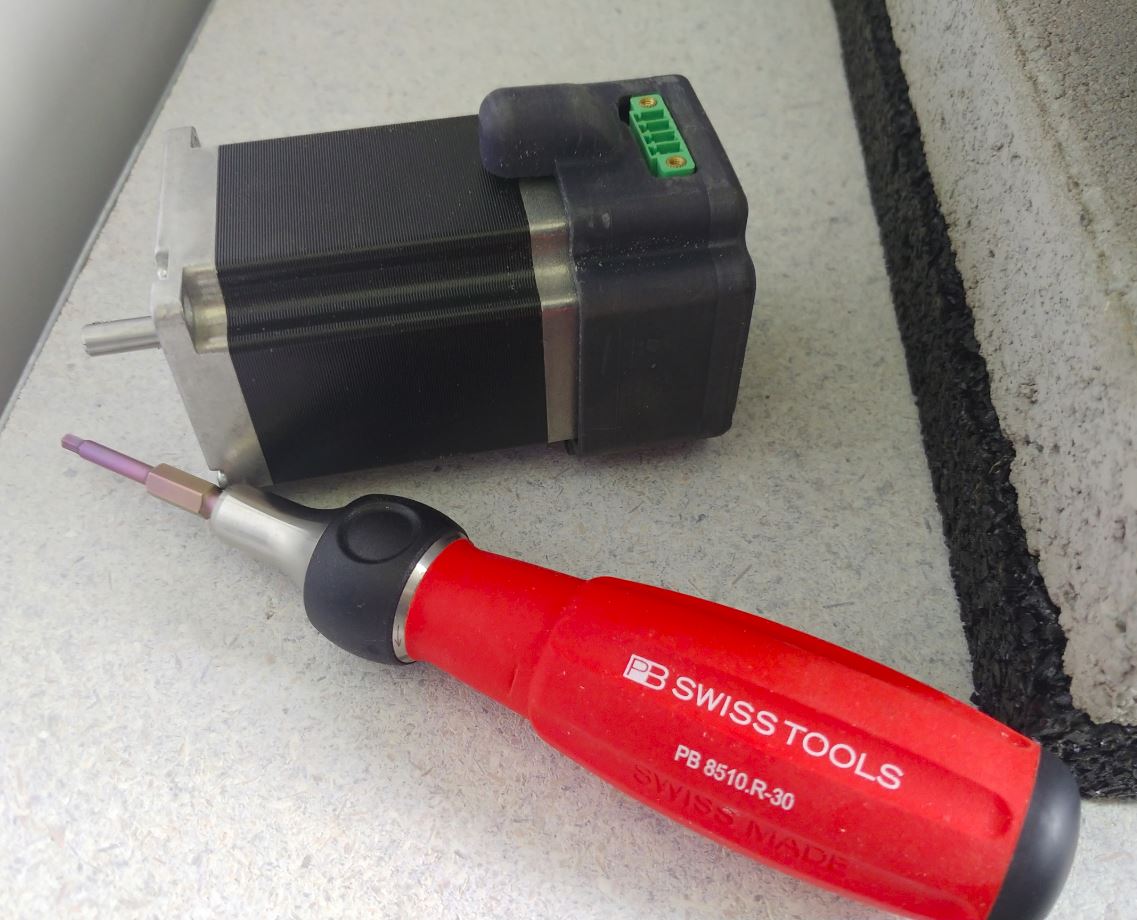
Years ago when I was building this CNC machine, I decided to design and print a NEMA23 stepper motor cover to wire the machine neatly. Today, I upgraded the stepper to an servo. All I took was a screwdriver.

If you want to build or remix it: https://www.printables.com/model/96550-nema23-stepper-cover-hut-wago-terminals

59


I've created this nozzle insert for the Prusa Toolbox, it's for the standard Prusa MINI nozzles which should be the same dimensions as E3D V6.

60


I'm in the process of building this - should be done within a week if my needles will come in. Really looking forward to it since I started hand knitting a pair of socks ~4 years ago and they're maybe 20% done :D

Prints are pretty easy but two are longish (15hrs and 27hrs on my machine/ settings).

Anyone tried something similar?

https://m.youtube.com/watch?v=2y1gakl4IEw

61


This is a spoon that allows fast and precise spooning. You can easily fill your smallest and largest dessicant containers without spilling the tiny pearls - say goodbye to funnels. The unscaled spoon can hold ~12ml that is 10g of silica-gel pearls. Simple print, no supports, three walls, can be scaled if needed

62


This is an upgrade for the "Parkside Multi Grinder Holder" by rechena. Please also check the source creator. The changes are the following: The lower rear part has been reduced in height. The front part has been reduced in height, different for Parkside and Dremel. These changes were made to ensure the horizontality of the tool. Centering nuts were added, because the front support hole is wider. (3/4x12 for Dremel and 18x1.5 for Parkside) Screws have also been added to keep the original nuts when not in use. It is recommended that the nuts and screws be printed with the wider side down and at the finest resolution to ensure thread quality. Note: Fits Dremel 4000 and Parkside PFBS 160 C3

63


Exact same file as the one posted by HarderDIY just with the model rotated so it prints on end. Find it easier to remove the supports that way. I printed at 0.75 scale for a more reasonable size for a keychain. I may re-upload this with the prongs on the male end separated a touch as it has a bit more play than I would like when buckled together. EDIT: This is maybe not the best idea at 0.75 scale with PLA... broke in less than 24 hours due to the layer direction I think...might be better with PTEG or better layer adhesion. My printer isn't tuned the best right now so might be a me problem ahaha

64


Heyho I wanted to mix a few samples with different colours or additives with epoxy resin and was looking for small mixing sticks. Unfortunately I haven't found anything really suitable in size. So I constructed a mixing stick myself. It was so small that it could just be made cleanly with my 0.6 mm nozzle. XS = 24,5 mm Diameter S = 39 mm Diameter M = 49 mm Diameter L = 70 mm Diameter Of course all models are support free for a good print! Tip1: Mixing bowl. If you also want to print a mixing bowl, simply generate a cylinder in the slicer with a slightly larger diameter than the stirring rod and print it in vase mode. Tip 2: Scale. You can scale the models up or down even further. However, make sure that the tolerances also become larger/smaller. That is why I have generated different versions as a starting point for you. Assembling instructions: Printable versions: For the fully printable versions you only have to glue the axis with the mixer. If you stir epoxy resin with it, this bonding will occur and solidify over time anyway :P So a small dab of superglue is perfectly sufficient. Also keep in mind that you can scale the axis to lengthen or shorten it! Versions with a (wooden) stick: For these mixers you need (wooden) sticks with different diameters and 3 mm wood screws to fix them (glue may also work). The advantage is that these are even stiffer & more stable than 3D printed axes. It is advisable to pre-drill the logs with a smaller diameter to avoid tearing the wood. Wooden stick sizes: XS = 6 mm Diameter S = 8 mm Diameter M = 8 mm Diameter L = 10 mm Diameter Have fun and keep printin!

65
2
submitted 11 months ago* (last edited 11 months ago) by [email protected] to c/[email protected]


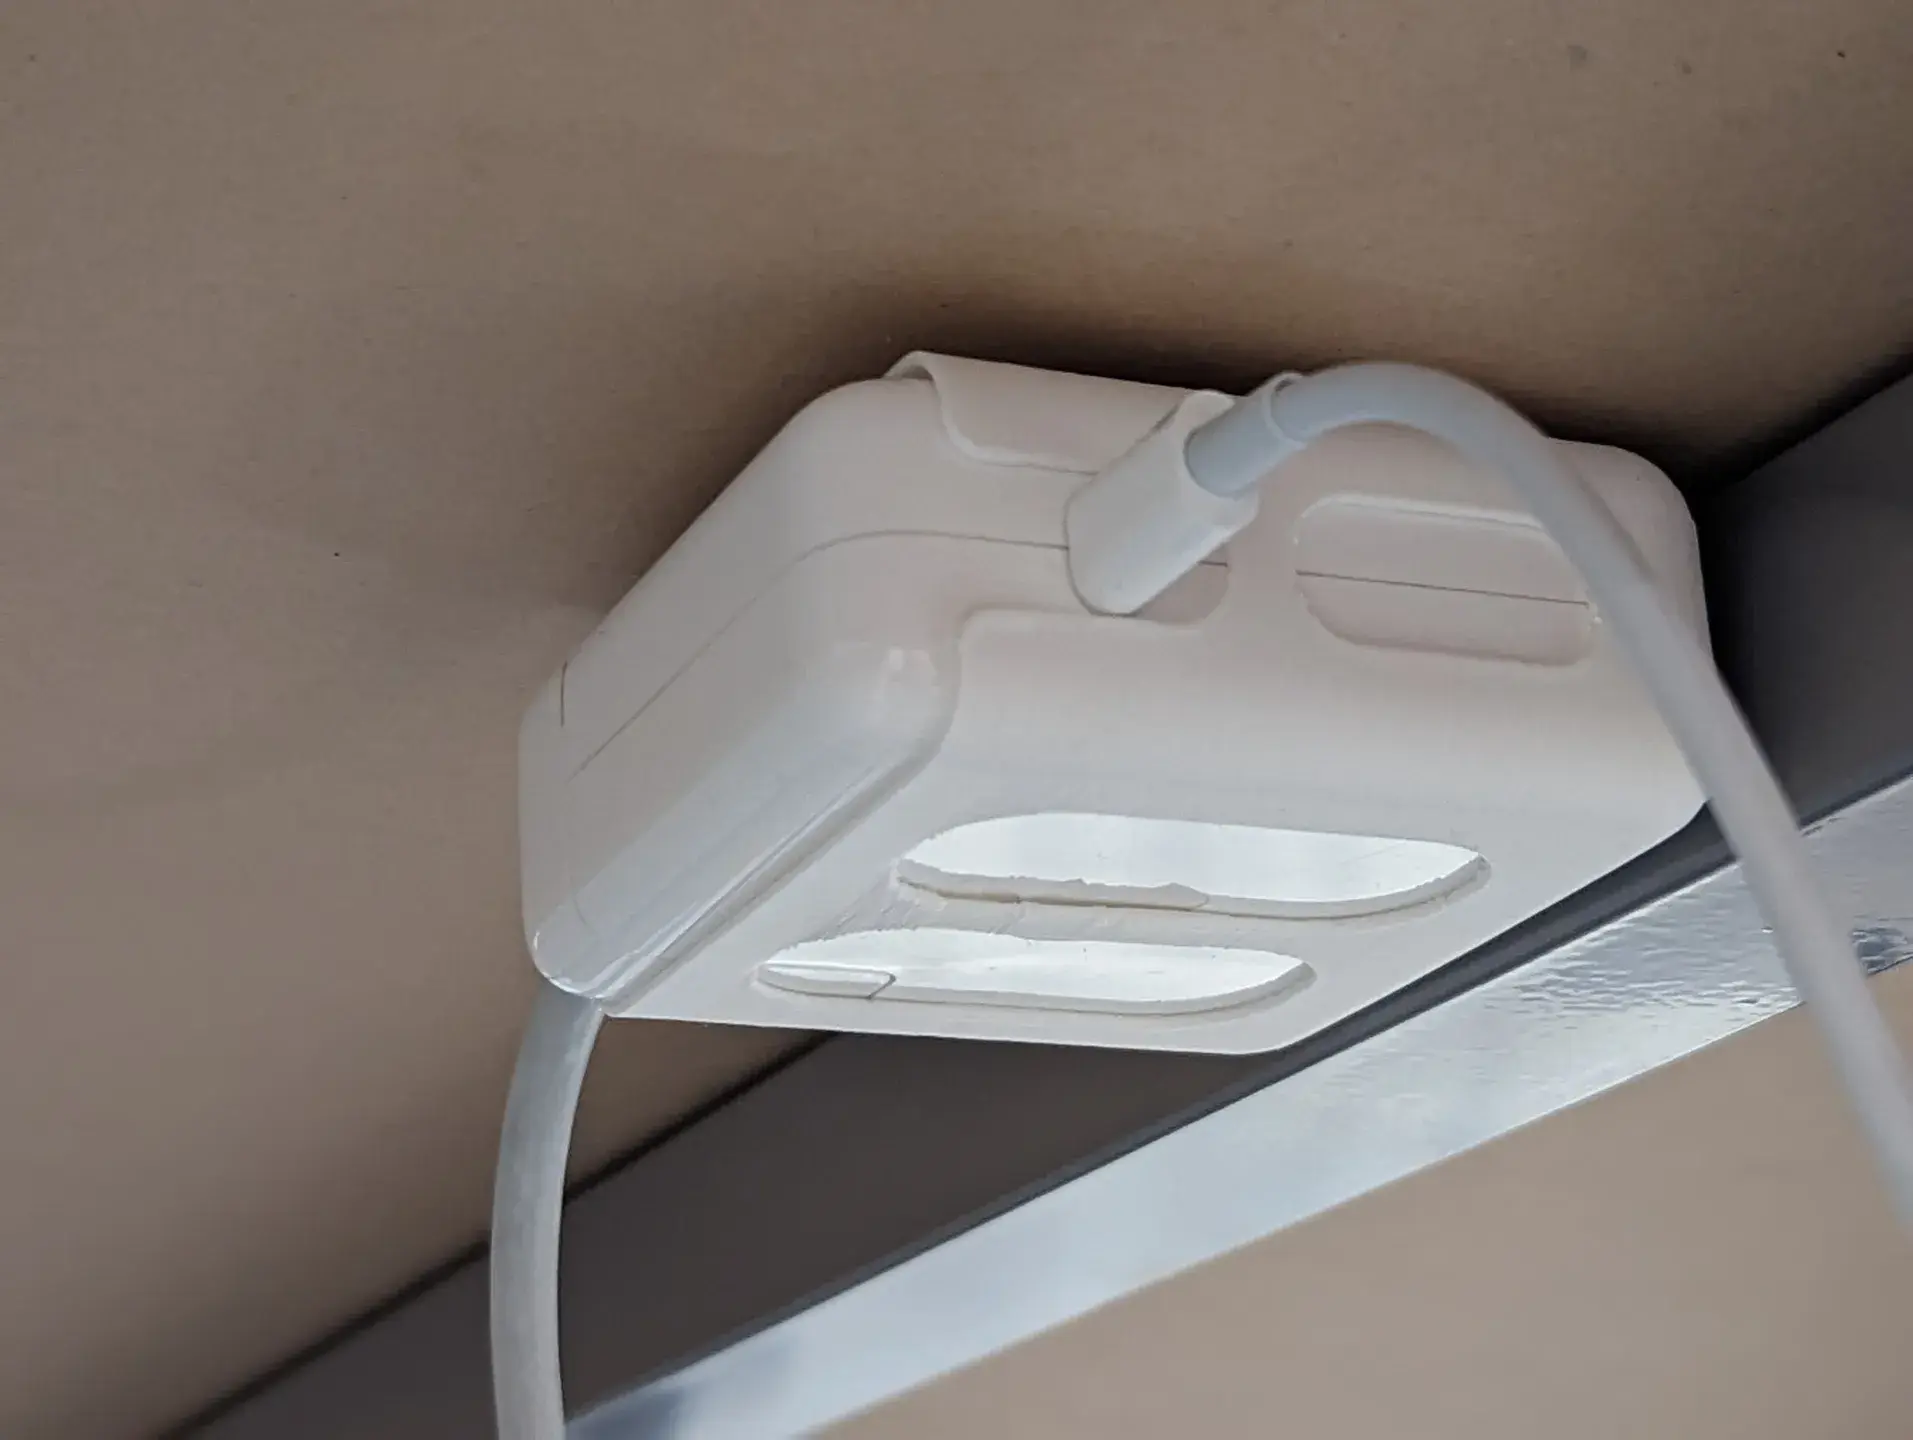
https://www.printables.com/model/389110-under-desk-mount-for-apple-macbook-pro-61w-power-b

Just updated this under desk mount I designed for my Apple MacBook charger. I like the aesthetic of this design but I'm still not happy with the print quality because of the need for supports, and the overhangs of the curved base can be a challenge.

For my next revision I want to redesign the vents and mount pointd to minimize and overhangs and reduce/eliminate the need for supports.

66


Hi guys! Here is my engine cover design for the well beloved Simson S51 Moped. It features a removable ignition cover, so you can replace it any time with the open one or with anything you like. It also features a regular clutch bowden adjuster/tensioner. I hope you will like this one! Other designs are coming soon. #LP @kiraly.d In order to fully assemble the part, you will need the following items: 6x M5x10 inner hex head bolts 6x M5 nuts regular clutch bowden adjuster/tensioner (!must have!) PET-G and ABS are recommended as a printing material.

67


Is there a way I can track how much filament is left on a roll?
Either an add-on sensor I can build or software that will track how much is used vs how much is supposed to be on the roll?

Have a Prusa Mk4 and it's working ok so far but been having trouble with very long prints so trying to figure out if my rolls have enough left

68


4 original latches were broken, I tried to make them from different ones - with a larger wall thickness when printing, with a large infill, from PETG and SBS plastics. All broke down over time. I made a spring latch, there is nothing to break in it. need: 4ps screw M4 25 mm - for model Celling mount 2ps screw M4 25 mm, 4ps M4 12 mm - for model Wall mount spring D8~6 mm, length ~ 20 mm Wall mount part names start with a letter W (Wall) Ceiling mount part names start with a letter C (Celling) 4.10.22 Add on Made the TopPlate V2 and Plate V2 details. Now it should be easier to install the latch in place. 02.11.22 New model with vertical wall mount mechanism All details, except for the "PIN" detail, are redrawn. For wall mounting print details starting with the letter "W" (Wall). You will also need two M4x25mm screws and four M4x12mm screws. M4x12 screws will need to be threaded into the "Wwall" parts, screwed on both sides. The "Wwall" part is best printed as in the picture, using supports from the table to keep the round screw holes.

69


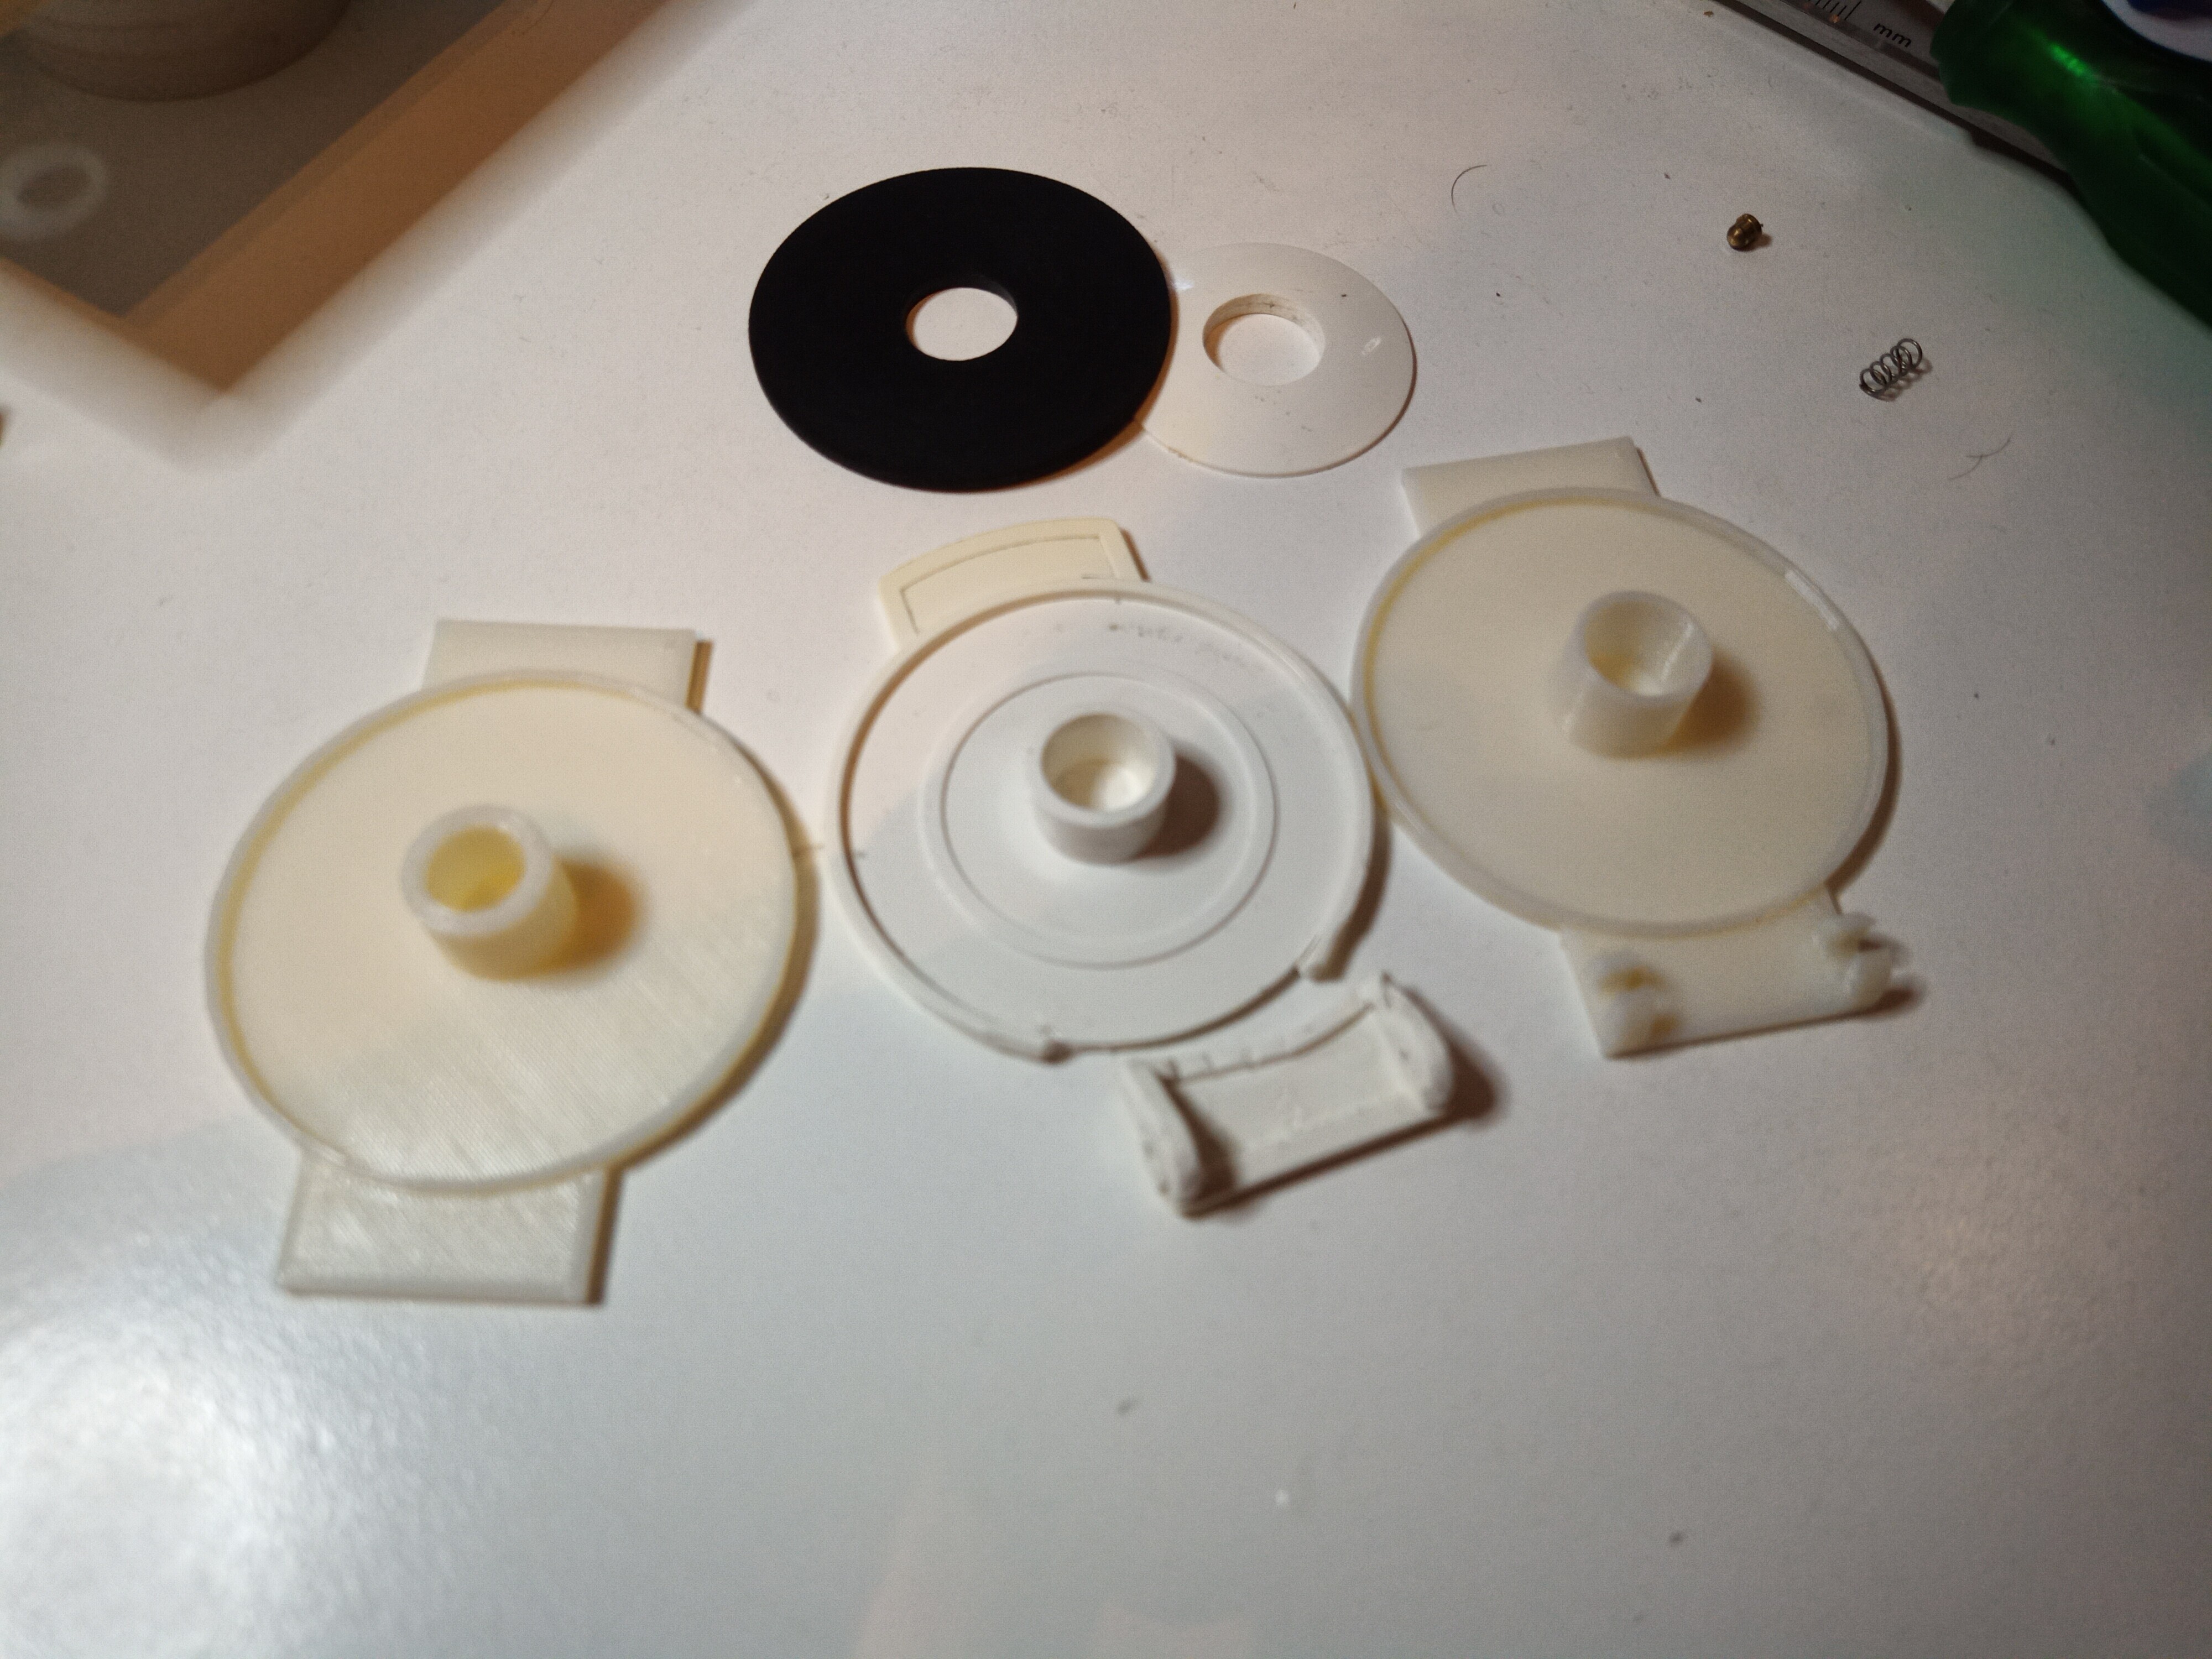
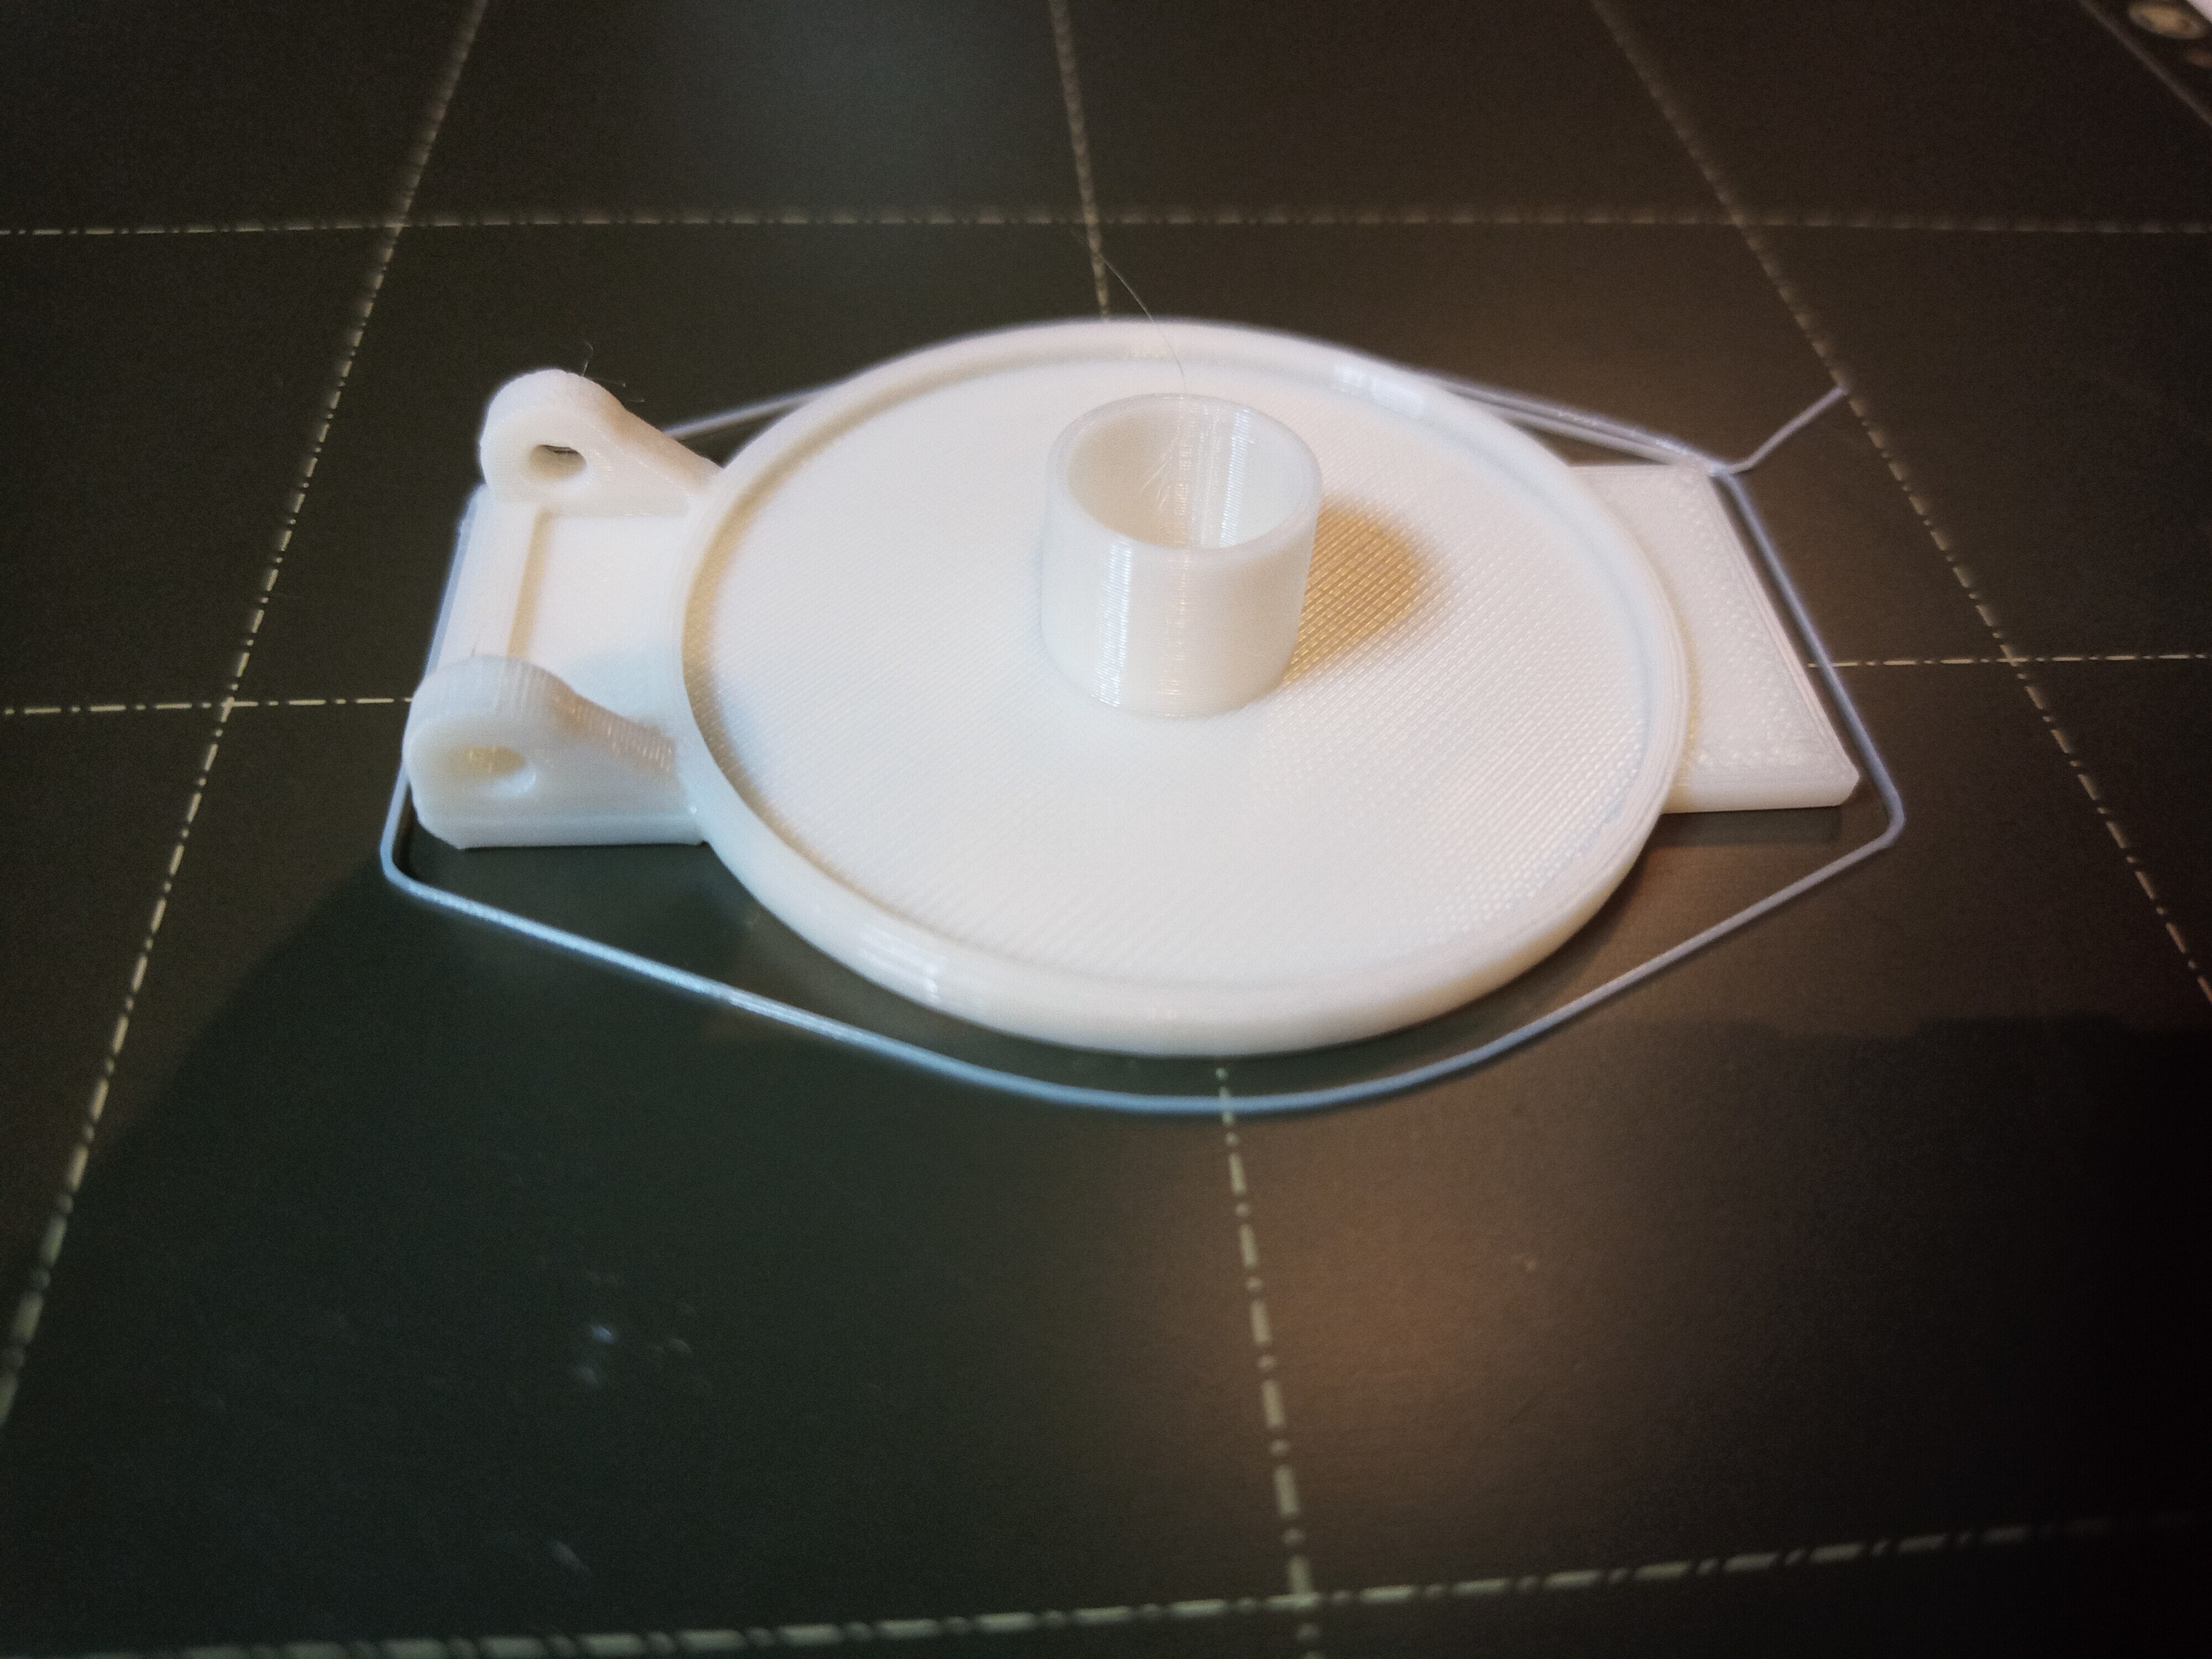
My kids broke the flap on one of our sockets, so I had to look into getting them replaced.

Initially I tried to make them clip on to avoid having to remove the complete socket for future replacements, but that ended up either weakening the hinges too much, or making it impossible to attach it with the spring in the right position.

The gasket and O-ring are donated from the original flap:

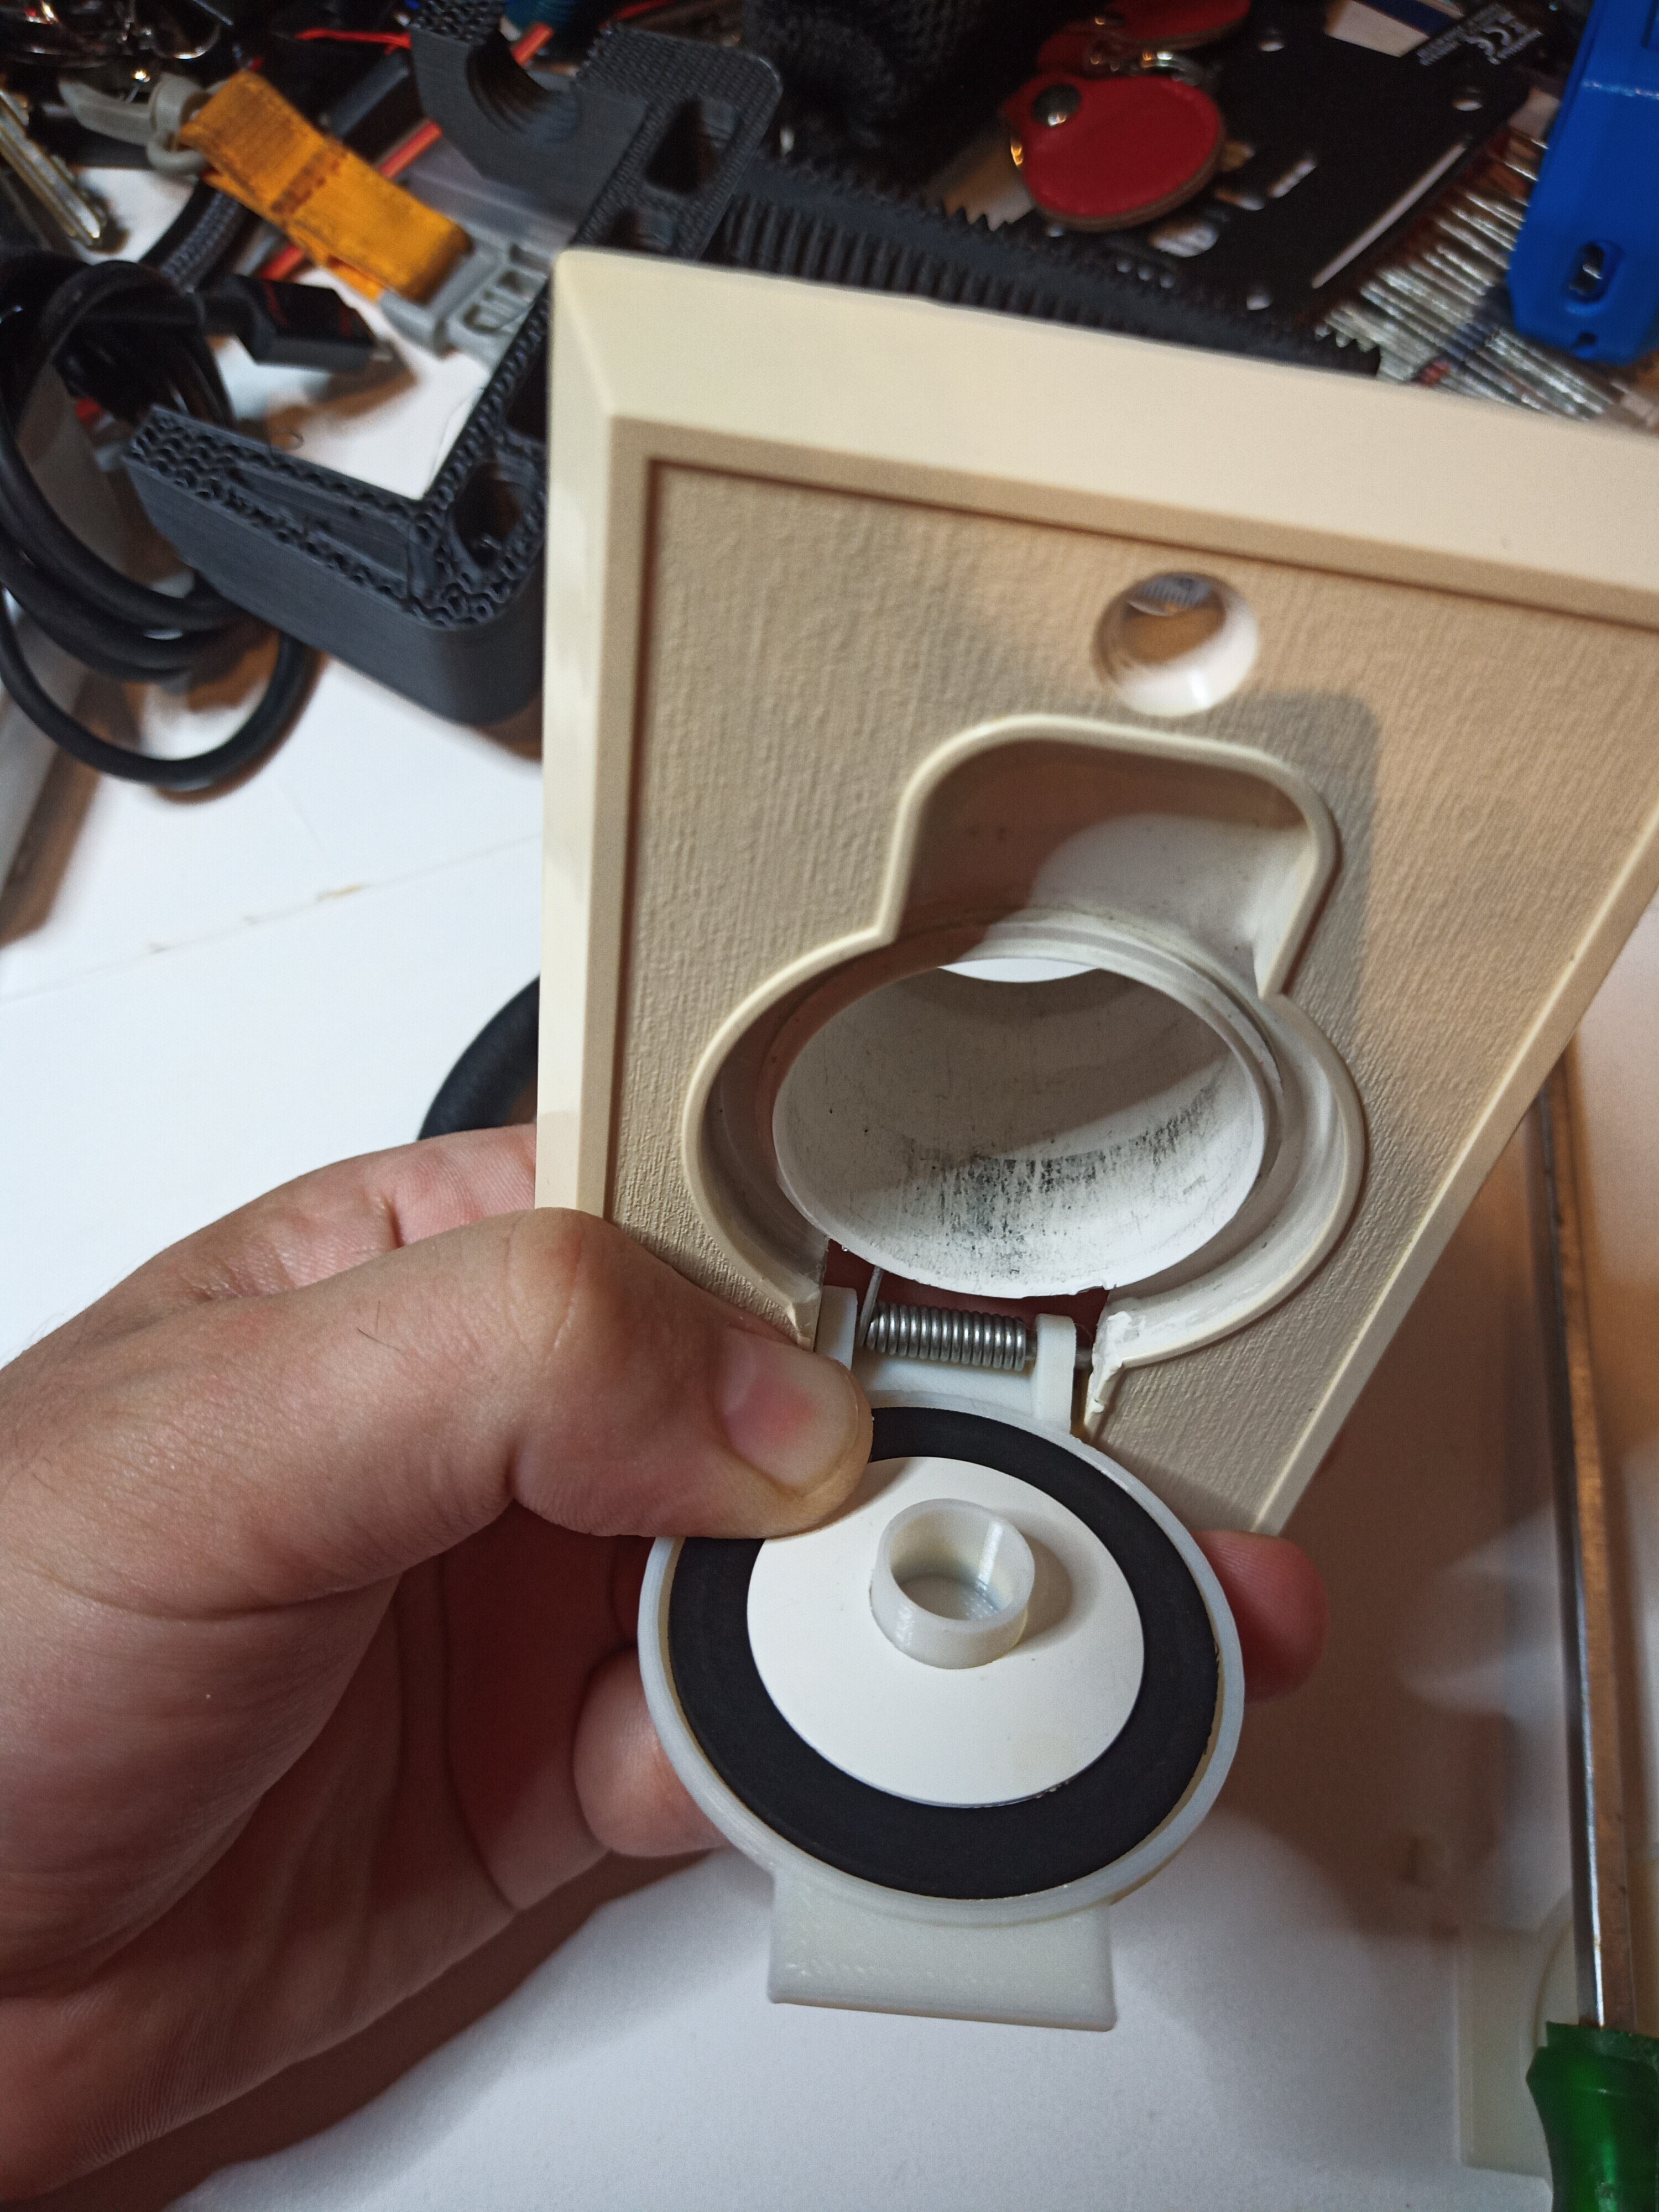
The original flap and the first test prints to check if I got the dimensions right:

The whole thing is over on printables

70


My phone with the case is just barely too big for the slot in the K480, so after a few years of saying I should do something about it I finally did! Designed in Onshape, printed on a modified CR-10v2. Would welcome any suggestions, I already have v3 ready to go to fix the slot bit, it's just a titch too big.

71


Boite de type container permettant le rangement des outils de l’imprimante Creality K1, il semblerait que cela ne puisse convenir à la K1 Max. La boite, haut et bas sont en PLA ainsi que le clip. Le reste est en TPU. Les différents axes de la boite sont réalisés directement avec du filament PLA. L’ attache clip, en TPU est renforcée avec un clou de 1 mm, permettant ainsi d’avoir à la fois de la rigidité et de la souplesse. ========= Container-type box for storing the tools of the Creality K1 printer, it looks like it can't fit the K1 Max. The box, top and bottom are in PLA as well as the clip. The rest is TPU. The different axes of the box are made directly with PLA filament. The clip attachment, made of TPU, is reinforced with a 1 mm nail, thus providing both rigidity and flexibility.

72


Inspired by the "CNC 3018 Pro - Dust Collector" I designed this suction adapter, because I wanted to forfeit as little freedom of movement laterally as possible and the motor diameter did not fit. Additionally, I like the idea with the brushes from the Heise-Make suggestion. The lower shell is removable to change the drills and is also held with neodymium magnets. To make it easy and stable to glue the parts and the bristles together, I used ABS. Together with ASA, the two materials are also well suited for the hose adapter because of the low sliding friction to prevent torsion of the suction hose when the milling head moves. My CNC3018-Pro version has the following dimensions: Motor diameter: 44.5 mm Milling head width: 64.4 mm Without the hose adapter, a hose with 33 mm inner diameter can be directly attached. With the hose adapter, a hose with 23 mm outer diameter is required, as used for the waste water hose of washing machines. The neodymium magnets are 10 mm in diameter and 2 mm thick. The brushes can simply be pulled out of an old plastic hand brush and glued in place as a buechel. Then the bristles have to be trimmed to length with scissors. As a vacuum cleaner I use this turbine with attached dust bag and a cyclone for dust separation. Inspiriert vom „CNC 3018 Pro - Dust Collector“ designte ich diesen Saugadapter, da ich seitlich möglichst wenig Bewegungsfreiheit einbüßen wollte und der Motordurchmesser nicht passte. Zusätzlich finde ich die Idee mit den Bürsten vom Heise Make Vorschlag gut. Die untere Schalle ist abnehmbar um die Bohrer zuwechseln und wird ebenfalls mit Neodym-Magneten gehalten. Damit die Teile und die Borsten einfach und stabil zusammengeklebt werden können, habe ich ABS verwendet. Zusammen mit ASA eignen sich die beiden Materialien auch für den Schlauchadapter wegen der geringen Gleitreibung gut, um eine Torsion des Saugschlauches bei Bewegungen des Fräskopfes zu vermeiden. Meine CNC3018-Pro-Variante hat folgende Maße: Motordurchmesser: 44,5 mm Fräskopfbreite: 64,4 mm Ohne Schlauchadapter kann ein Schlauch mit 33 mm Innendurchmesser direkt aufgesteckt werden. Mit dem Schlauchadapter wird ein Schlauch mit 23 mm Außendurchmesser benötigt, wie er für den Abwasserschlauch von Waschmaschinen verwendet wird. Die Neodym-Magnete sind 10 mm im Durchmesser und 2 mm dick. Die Bürsten können einfach aus einem alten Kunststoff-Handfeger herausgezogen werden und als Büchel eingeklebt werden. Anschließend müssen die Borsten mit einer Schere auf Länge gestutzt werden. Als Sauger verwende ich diese Turbine mit aufgestecktem Staubsaugerbeutel und einem Zyklon zur Staubabtrennung.

73


Hi, this is a lens filter case. I made it for my variable nd filter. The diameter and height are customizable in the FreeCAD file (in the table "data"). The files here are with 66mm diameter and 12mm height. Hallo, Dies ist ein Gehäuse für Objektiv Filter. Ich habe es für meinen variablen ND Filter erstellt. Der Durchmesser und die Höhe können in der FreeCAD Datei angepasst werden (Tabelle "data"). Die Dateien hier sind für einen Filter mit 66mm Durchmesser und 12mm Höhe.

74


This is my awesome one-handed soldering iron build, I call the Solder Sustainer! Everything you need to build it can be found at https://www.roboticworx.io/p/build-a-one-handed-soldering-tool for free! (If there's a pop-up just hit "DISMISS" at the bottom.) To support my work, please consider becoming a free subscriber on my page linked above, it would really help me out and allow me to make more projects! :D Happy making! Demos:https://www.youtube.com/watch?v=CI2AZPYC_qo&t=3shttps://www.youtube.com/watch?v=tgRbwhpl7jk&t=5s

75
 
 
view more: ‹ prev next ›