Reuse, refurbish, reinvent

330 readers
1 users here now

A place to showcase and discuss projects that reuse, refurbish or reinvent existing objects/ideas. 3D prints and thrifting is welcome. Any kind of related content is welcome, as long as it doesn't stride from the rules too far.

Current banner: Pea trellis by @PlaidBaron.

Rules:

  1. Follow the Lemmy code of conduct.
  2. Don't downvote posts or comments just because it doesn't appeal to your aesthetics.
  3. Be nice to one another.
  4. No nudity or NSFW content.

Rules are subject to change depending on the needs of this community.

Related communities by topic:

founded 1 year ago
MODERATORS
1


Original FB link: https://www.facebook.com/groups/215658688640/permalink/10161195405893641/

Translation of original post:
Last summer I got two "hanging chairs" from someone who didn't have room for them anymore. I've been thinking and thinking about what to do with them, but today I found an old swing [stand, added as comment] that someone else gave away, it turned out perfect! Just trying to figure out what color the stand should be.... What do you think? I'm leaning towards black, white or red. Our house is red

2


cross-posted from: https://lemmy.world/post/1338474

I've been searching around for resources to add to my list of thrifting or freecycling resources online.

I've seen these two:

I have questions regarding each site:

  • Is it frequently used for free items/freecycling?
  • Is it moderated or unmoderated?
  • It seem to be free to post ads for both, but is there a catch?

Are there more sites like this in Germany?

I know that https://de.freecycle.org/ is also available and somewhat active. I've also gotten tips about https://mundraub.org/ (thank you @[email protected]) that I've added to the list.

Thank you in advance.

3


cross-posted from: https://lemmy.world/post/1338303

I am trying to locate good online resources for thrifting and freecycling items, and have had some tips for good resources that I put into a list. I found out about Kijiji yesterday, but other than Wikipedia entries (and the sites branding-oriented info), I know little.

If anyone knows, I'd love to get some more information regarding Kijiji.

  • Is it frequently used by Canadians for classified ads regarding second hand?
  • Is there a more popular option?
  • Is it fequently used for free items/freecycling?
  • Is it moderated or unmoderated?
  • It seem to be free to post ads, but they charge for increased visibility.

Thank you in advance.

4


Source: Transcend furniture on YT, link to the video in question

This beaten up chest of drawers, turned into cat condo, is a playful take on how a mid century modern (MCM) piece that was beyond rescue can be reused and reinvented.

I'm not a fan of dark or brown tinted wood furniture, but I must admit I kind of like walnut, and I wouldn't mind a piece like this in my home. I have lots of (cheaper) scrap material from repurposing (mainly) IKEA furniture, and just picked up some Bestå sideboards for free that I plan on reinventing as something for both storage and cat hideout.

Angie, who has the channel Transcend furniture, is a skilled furniture restorer. She started furniture flipping with painted pieces, and developed the skills to restore and refinish wood furniture so that she could turn her hobby into a business. Now, she is mostly working with mid century modern pieces, but it is still enjoyable and inspiring to watch.

In this video, she is more playful and creative. She also goes through how to restore veneer, strip old finish, fix imperfections, and then onto seal, tint and laquer.

Some shots from the video:
Restoring veneer on a piece of wood
Measuring for the scratch post
Installing the slats

5


When you have a smaller space, like a student dorm room or tiny apartment, functional furniture and storage is tricky. Sometimes the kitchen nook is so small that you can't fit a normal table, and the hallway too narrow for a normal console. Folding console tables, while practical, can make it feel too temporary and bare. And it's hard to get hold of free or thrifted furniture that fits in the space.

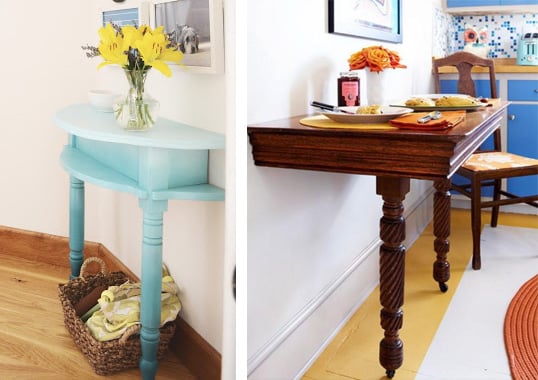
One idea which I think is nifty is looking at more worn furniture, like wobbly end tables or dining tables that are so banged up that they're ready for the burn pile. You can then cut the table to the desired depth and discard the damaged parts (or make two console tables!). Paint/refinish them, attach them to the wall and turn them into console tables that fit your space and style.

Kitchen breakfast console
Victorian wooden table cut in half and used as a console
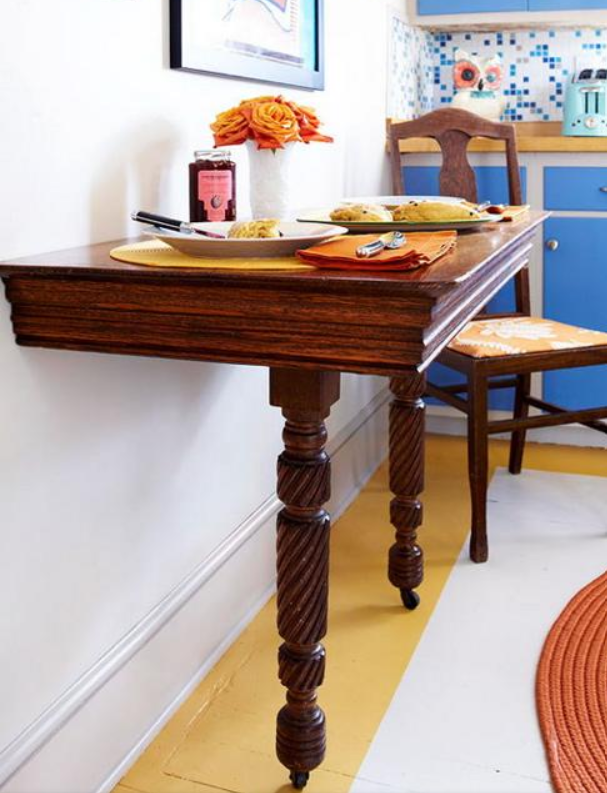
Source: Unknown (tried Google Lens and Tineye, only got Pinterest and Lushome results)

Nicely refinished wood, and seems to fit the style of an eclectic kitchen (I sincerely hope that the original table wasn't in a good condition before being thrifted though).

Entryway console table
Round end table sawn in half and used as a console in entryway
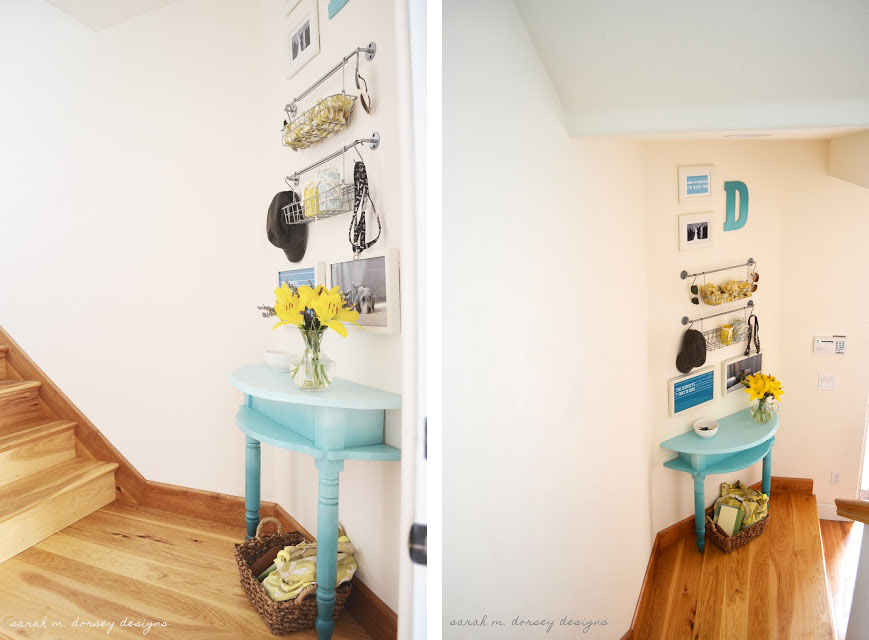
Source: Sarah M. Dorsey of Dorsey Designs

Interesting take on a console table. The link shows the process step-by-step.

Another hallway console table
Shabby chic victorian console table
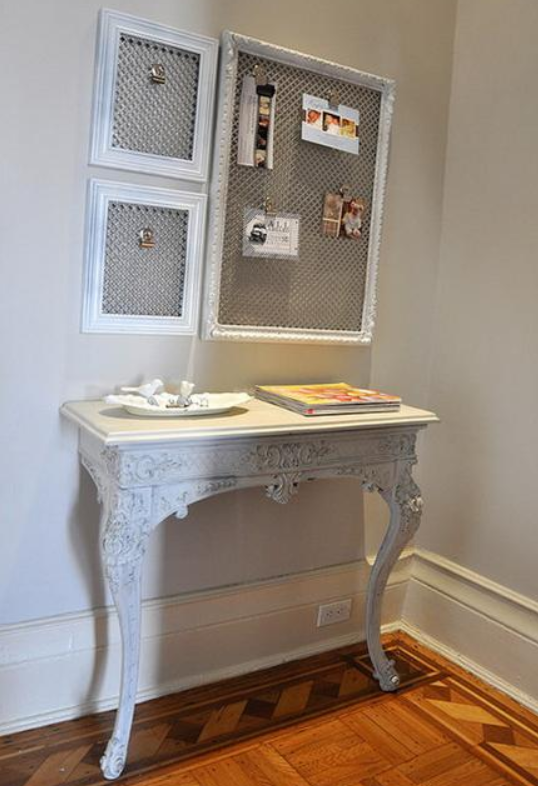
Source: Unknown (tried Google Lens and Tineye, only got Pinterest and other sh-t results)

Fancy table remade as a console, matched with empty picture frames for organizing mail and miscellania by the entryway. Shabby chic, but some probably like that style. To each their own...

Stacked consoles
Four stacked consoles painted in different colours
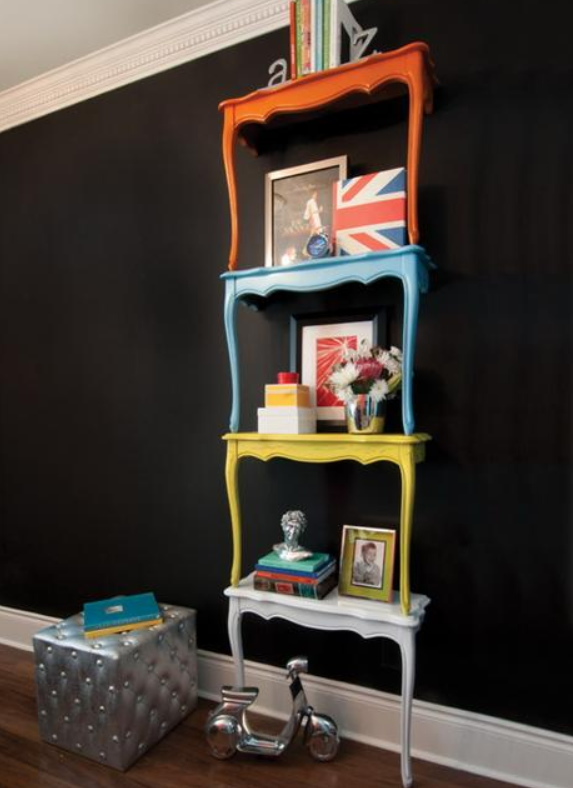
It's beginning to get weird...

...
Several columns of stacked consoles
... this is going to far...

... for f--k's sake, stop...
Several consoles, desks and drawers stacked and painted purple
... console-ception!

I'm stopping here before I burn this post down.

6


This is one of the reuse projects that I stumbled upon several years ago, and I am happy that the creator is still active. Daniel Maher, of DM Stained Glass [Facebook], makes stunning stained glass windows, and teaches courses for beginners and the more experienced.

The project I was first impressed with was a window made of green bottle bottoms.
Window made of green bottle bottoms
Credit: Daniel Maher

The style originates in what is called crown glass windows.

Daniel has done several such "stained glass" windows since, which he shows in his gallery of Housewares Graveyard. Even though these windows require a level of mastery to make, I think they serve as an inspiration for reuse of old bottles, or even some "poor mans stained glass" [YouTube, New Yorkshire Workshop] with Vitrail and lead-like edge banding.

Description from the Housewares Graveyard gallery:

The Graveyard series are windows whose primary glass is rescued from the mundane life of serving bowls, platters, goblets, lids, jars and general household utility. There are a limited number of glasses available as a "stained glass" material that possess strong prismatic qualities or have images imprinted in them. The texture of glass bends light depending on its irregular or cut surface. Assembling the variety of textures creates a jewel-like symphony of texture. The limited availability of these objects makes each piece unique and a one-of-a-kind work of art.

7


We were having issues with an annoying crow who repeatedly yanked out my pepper seedlings to get at tasty worms/other bugs below. Thankfully this old window screen mesh proved to be enough of a deterrent.

[Image description: a raised garden box with pepper plants. Around the base of the plants is a mesh screen, held in place with rocks and stakes. A cat is staring at the camera in the background.]

8


I'm not going to bore you with the history of the Billy bookcase, the Wikipedia entry can. What the history page won't tell you is that it's also a pun, as the Swedish word "billig" (usually pronounced the same as Billy) means "cheap" or "affordable" in English.

They're so common and affordable, that they're almost hard to give away for free when you're bored with them. There are many different thrifty or reuse options though (I butchered one I got used for free for my custom printer and NAS station).
Lots of ads for free Billys to pick up

This is not intended to be a curated "7 ways to trAnsForM y0uR bIlLY!", just some inspirational examples. Google IKEA Billy hack and you'll get thousands of results. Just stay away from Pinterest, a lot of the examples there suffer from linkrot or link to cancerous ad blasted pages.

Built in bookcase
The below is just one example, but it's nicely done with integrated wall plugs, light switches and fancy light fixtures.
Billy integrated into the wall as a builtin, with brass light fixtures
Source: The Sommer Home

Horisontal TV bench
Two narrow Billy bookshelves laid on the side and joined together
Source: Dalia E. Aly [Instagram]

Switch out the doors and give it a new lick of paint
Billy bookcases with new doors in peach pink
Source: Lara Bezzina

Thrift several Billys, use one for scrap material for gabled roof and make a doll house or two
Two doll houses made from Billy bookshelves
Source: Tamara Central

Fancy shoe shelving in a walk-in wardrobe
White bookcases with glass doors used for shoe storage
Source: Connie and Luna - how to organise your shoe collection

Thrifty not-so-fancy shoe shelving in hall closet
Billy bookshelf chopped in half and used as shoe storage
Source: My own messy hall closet. I thrifted some really old Billy's that were 75 cm wide, which fit perfectly inside my 80 cm hall closet, chopped the top part off of one of them and voilá - shoe shelving for free. More info in the linked post.

Enough of my ramblings, this is starting to look like Pinterest (sorry). Go get some thrifted or freecycled Billys, go forth and experiment.

9


Very basic and simple, yet it might be handy for some people. We were thinking of making one for a teenager who wants to play games on the laptop in bed, albeit with a different look.

Laptop desk with laptop in a sofa

From the blog:

This scrap wood DIY Laptop Desk is a one-hour project to get that overheating laptop off your lap! Complete photo tutorial inside!

Want to know a semi-secret about me? I’m a gamer. When I tell people this, I always feel the need to clarify a bit- not one of those first person shooter gamers. Violence freaks me out. But simulation games (Sims, city builders,) and strategy games (Settlers of Catan on steroids,) I’m all for.

As you might expect, I have a pretty hefty laptop. It gets hot. Really hot; enough to burn my legs. And if my legs are burning, that’s probably a bad sign for the insides of the laptop.

So I wanted to create a laptop desk that not only holds the laptop off my lap, but also helps cool the laptop. What I mean by this: most laptops have fans on the bottom of the machine that blow hot air out of the machine.

On a normal desk, the hot air hits the desk, and then is pushed right back into the machine by the desk. But on the DIY laptop desk I built, there are spaces between the wood, allowing that hot air to escape.

Those spaces are a simple solution to help keep laptops cool and therefore extend their lifespans. Plus, this plan is super easy, coming together in under an hour of work!

10


This is an interesting project based on pallets, where they made a daybed for a patio. The process is described in detail. The armrests are made with industrial pipe and flanges, and it is movable as it has casters.

A daybed on a patio, made from pallets and industrial pipe

11


Jason on the "Epic Upcycling" channel is a fabulous YouTuber who takes scrap materials and pallets, and builds beautifully crafted furniture with them. He crafts metal hinges and knobs as well. He doesn't speak in the videos, it's just him working on the materials.

Screenshots of pallet to furniture videos

One warning: Do not listen to the channel with headphones on high volume. He doesn't tone down the sounds of table saws or metal working.

From his About page on YouTube:

Hi, I'm Jason, and my channel is all about making things out of junk. Most of the materials I use in my videos were discarded, or thrown away, destined for landfill, or the bonfire. These videos are not meant as tutorials, they are just to show the way I do things. I hope they will in some way entertain, and maybe help everyone to see the beauty and usefulness of every piece of scrap out there. Happy UpCycling :)

12


All material picked up off the side of the road, destined for the dump. I needed trellises for my peas and this fit the bill perfectly.

13


I've been trying to find simpler reuse/reinvent projects without only posting Youtube links (and avoiding Pinterest or content aggregator sites). I know Facebook isn't ideal as well, but I wanted to share this simple creation by a Swedish woman (post is in Swedish as well): Link to Facebook and the post

It's a clever reuse and reinvention of the old trampoline frame.

The translated contents of her post: We have made a rose arch/trellis out of an old trampoline. Split the trampoline in two halves and welded them together with pieces of the legs.

14


fun videos and interesting ideas

15


Katie is a Canadian who fixes and freshens up furniture from trash pickups or from thrift stores. She used to be a furniture flipper, but seems to do quite well now, so the furniture that she shows on her channel of late is usually kept for her own home or gifted back to thrift stores or friends.

While I may not always agree with the aesthetics of every refinished piece, I like that she gives new life to furniture that might otherwise end up in a landfill or burn pile.

Her channelon Youtube: Salvaged by K. Scott

The specific video from the post pic: Link to Youtube video

16


(Sorry for the messy backgrounds)

We had an old Alex drawer unit that was past its prime. I wanted to have a printer and NAS station for my home office that was adapted to the units that we had.

Someone had thrown out an old 80 cm wide Billy book case in the "burnables" recycling bin, and I rescued it from the trash. I cut it into the correct size to match the drawer unit, and joined them together.

Billy + Alex = printer station on wheels

Then I prime coated the unit and drawers, and sanded them four hours later. Then I painted two coats of colour in the colour scheme that I liked (dark turquoise grey), I let the paint dry for 8 hours and sanded between the coats. The colour I picked doesn't have to have a top coat. It also shifts colour depending on the light.

Primed and painted

Ready for use

I have another worn down Alex drawer unit that I plan to freshen up with a new coat of paint soon.

17


I really was inspired by some Youtube channels to dare repaint, re-stain or reinvent and reuse furniture, both mine and my friends', that was otherwise going to the landfill or trash burn pile. The DIY wife was one of these inspiring YT channels. As of late, they are designing their own furniture, so they might not be as relevant to this community. However, their older videos with restyling might be relevant to other people like me who are trying to save old furniture that is too worn out or doesn't fit the current aesthetics of your home.

Link to YT: DIY Wife

18


We had an old IKEA chest from the 90's that we didn't like. It was practical for storing winter gear (helmets, knitted hats and gloves, overalls, boots etc). But it was made from laquered pine, which (to us) was fugly.

We tried to give it away through different ads, but nobody was interested. Picture below is not my OC, it's another give-away ad (they probably considered it fugly too). IKEA chest made from laquered pine

Below pics are ours: IKEA chest from side IKEA chest from another side

As I was preparing to throw it into the "burnables" bin, one of my kids asked me: "Can't we reuse it as a cat litter box?" I didn't like wasting usable things, so we decided to reuse and reinvent it.

First we took the lid and chest apart, cut out a hole where the cats could enter, sanded and then primed: Chest is cut, sanded and primed

Then we painted it in our preferred paint colour, reassembled it, added water proof lining (glued and caulked) and a litter mat. We also tested the fit and looks of the intended litter box: Then we painted it in our preferred paint colour, reassembled it, added water proof lining (glued and caulked) and a litter mat

This is how it looked when the lid was closed, masking tape is still attached as we wanted the caulk to finish curing while the cats were eager to explore their new litter box: How it looked when the lid was closed, masking tape is still attached as we wanted the caulk to finish curing while the cats were eager to explore their new litter box

The cats approved of the end result. I put in a small LED spotlight from IKEA so that they would be even more comfortable with it. Cat approved end result, cat lying on lid

The cats totally approved, they loved the box, and with daily emptying/cleaning there was barely any smell in our entry hallway. Even visitors didn't notice the box or any smell.