Glaives are frisbees cosplaying as melee weapons. You hold your melee button to throw it, and press your heavy attack button to manually detonate an explosion while it's midair. The manual detonations pack a punch, and different glaives have different forced effects on the manual detonations, from forced status procs to disarming enemies.
Once manually detonating, the glaive will instantly return to you. To chain throws (and make use of the mod Power Throw), you hold down your throw button again as the glaive returns to you. Your Warframe will catch it and instantly throw it out again. You'll know the chain is successful because the throwing animation changes. You can see a video of chained throws in action here:
https://www.youtube.com/watch?v=-tjmrwYkhqo
Glaive Prime is notorious for being a strong Steel Path weapon. It's usually pretty expensive platinum wise, and is highly recommended and sought after. But it's not the only glaive in the game, and it's not the best choice for every situation.
I've put together some situational build variety below, and spent time in the Simulacrum to lay out the numbers for comparison:
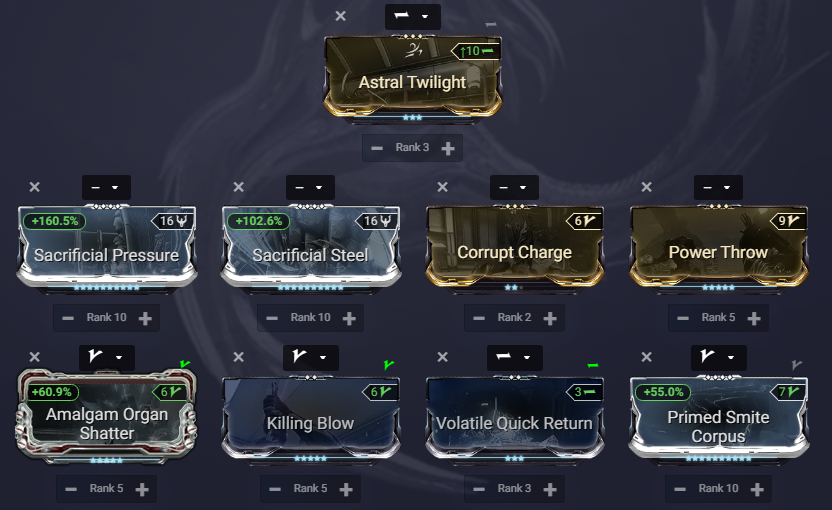
I want an all-round build that will deal with all factions on basic Steel Path:
Glaive Prime
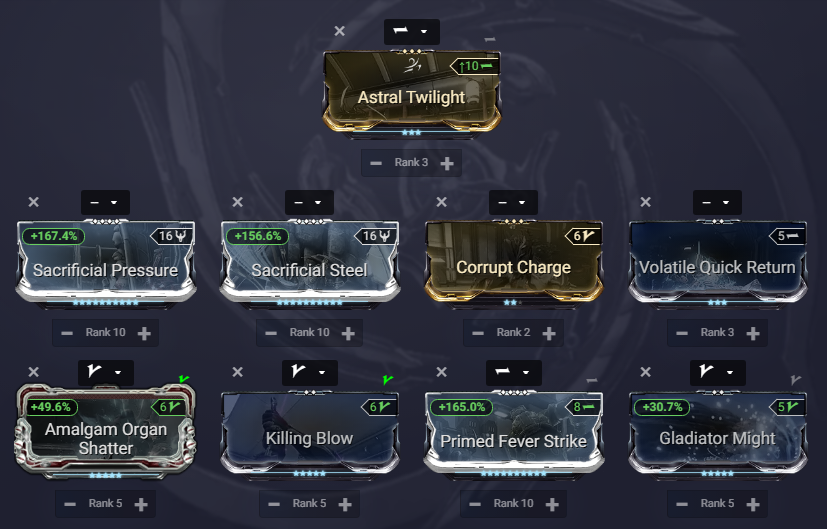 2 Forma required
You can expect basic Corpus units, most Infested, and weaker armoured Grineer to die from the initial damage of the manual detonation. The forced Bleed DoTs will clean up tougher units.
Forced Bleed DoT Damage:
- Yellow crit: 17k
- Orange crit: 32k
(Numbers are against the health of a lvl 185 SP Kuva Heavy Gunner)
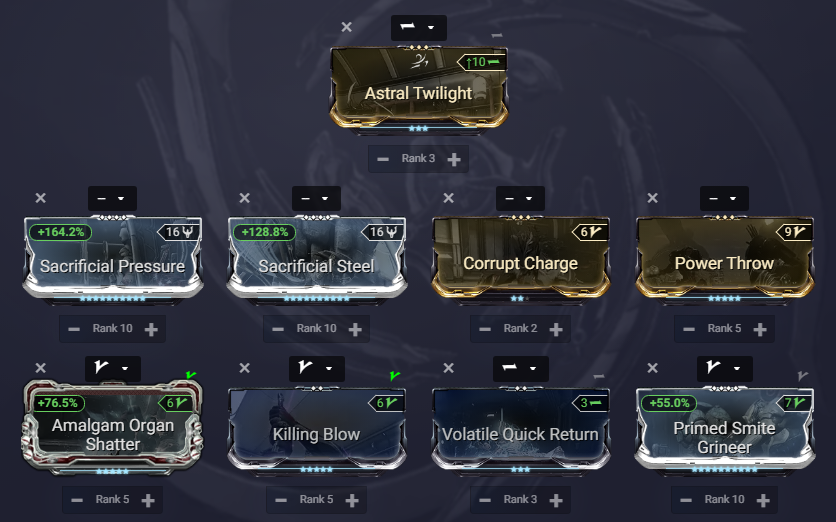
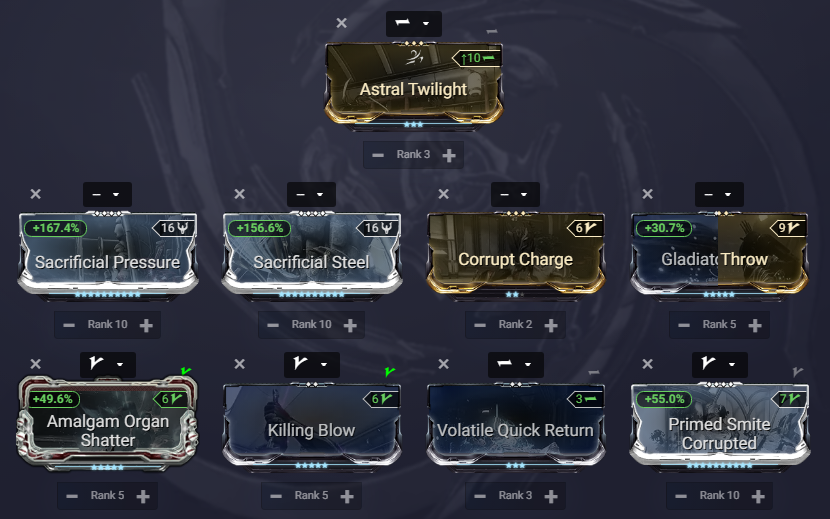
I want to specialise against Grineer:
Glaive Prime
 2 Forma required
You don't like to, or aren't expecting to chain throws. You're expecting the Bleed DoTs to do heavy lifting.
Forced Bleed DoT Damage:
- Yellow crit: 41k
- Orange crit: 76k
(Numbers are against the health of a lvl 185 SP Kuva Heavy Gunner)
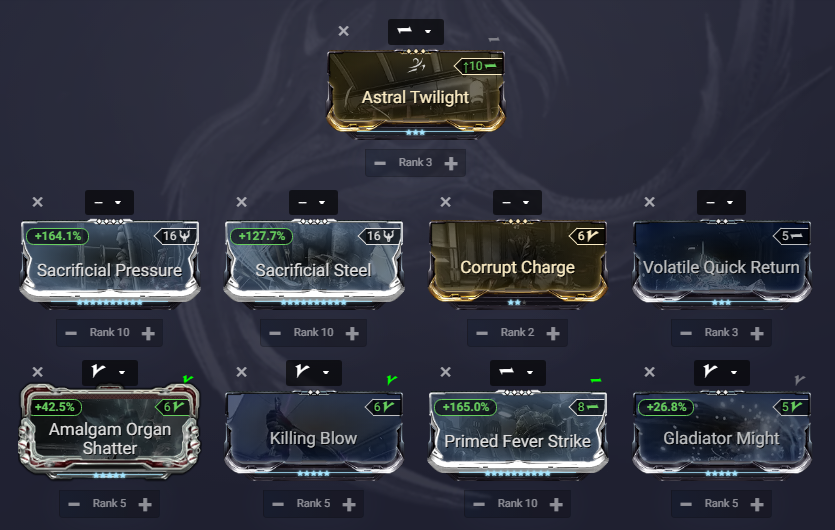
I'm doing endurance. I want the highest possible damage I can get against Grineer:
Glaive Prime
 2 Forma required
Enemies can take multiple hits, Bleed DoTs might take a few ticks, and you're happy chaining throws to make use of Power Throw to boost your damage.
Forced Bleed DoT Damage:
0 Power Throw Stacks
- Yellow crit: 32k
- Orange crit: 56k
1 Power Throw Stack
- Yellow crit: 63k
- Orange crit: 112k
2 Power Throw Stacks
- Yellow crit: 95k
- Orange crit: 168k
3 Power Throw Stacks
- Yellow crit: 126k
- Orange crit: 224k
(Numbers are against the health of a lvl 185 SP Kuva Heavy Gunner)
I want to specialise against Corpus, but I don't have a Faction mod:
Cerata
 3 Forma required
You're going all in on Toxin damage to bypass Corpus shields. You want high upfront damage, where the Toxin DoTs will clean up tougher units.
Forced Toxin DoT Damage:
- Yellow crit: 40k
- Orange crit: 72k
(Numbers are against the health of a lvl 185 SP Juno Tech Eximus)
I want to specialise against Corpus, and I have a Faction mod:
Cerata
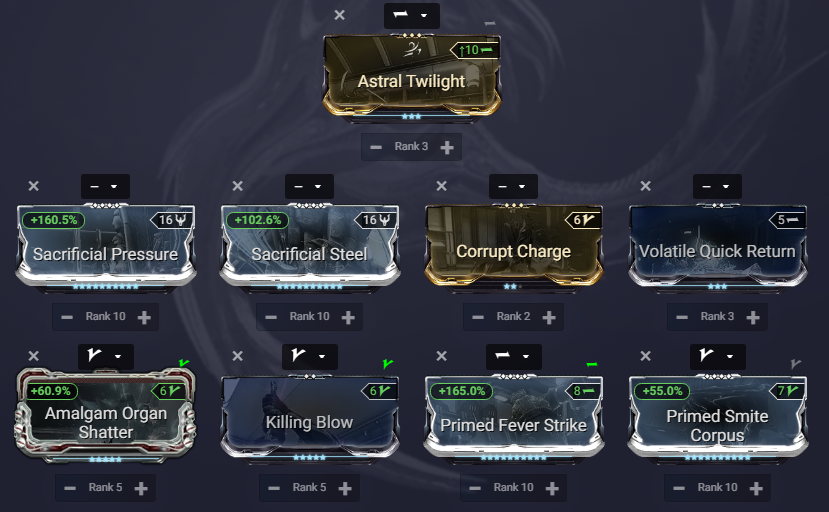 3 Forma required
You're going all in on Toxin damage to bypass Corpus shields. You want the highest upfront damage as you can get, where you're expecting the Toxin DoTs to do heavy lifting.
Forced Toxin DoT Damage:
- Yellow crit: 190k
- Orange crit: 336k
(Numbers are against the health of a lvl 185 SP Juno Tech Eximus)
I'm doing endurance. I want the highest possible damage I can get against Corpus:
Cerata
 3 Forma required
Enemies can take multiple hits, Toxin DoTs might take a few ticks, and you're happy chaining throws to make use of Power Throw to boost your damage.
Forced Toxin DoT Damage:
0 Power Throw Stacks
- Yellow crit: 72k
- Orange crit: 127k
1 Power Throw Stack
- Yellow crit: 144k
- Orange crit: 254k
2 Power Throw Stacks
- Yellow crit: 216k
- Orange crit: 381k
3 Power Throw Stacks
- Yellow crit: 288k
- Orange crit: 508k*
(Numbers are against the health of a lvl 185 SP Juno Tech Eximus)
*The SP Juno Tech Eximus instantly dies from the detonation damage before I can see the DoT. However, the previous numbers show that each Power Throw stack increases the DoT on orange crits by 127k
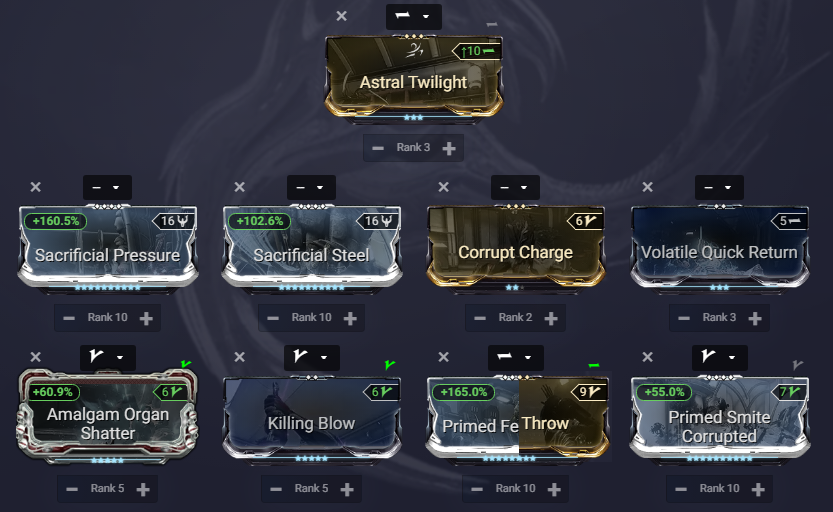
I'm doing long Steel Path fissures where the majority of enemies will be Corrupted:
Do you have armour strip?
No - Glaive Prime
 2 Forma required
Yes - Cerata
 3 Forma required
Yes - Xoris (or Falcor)
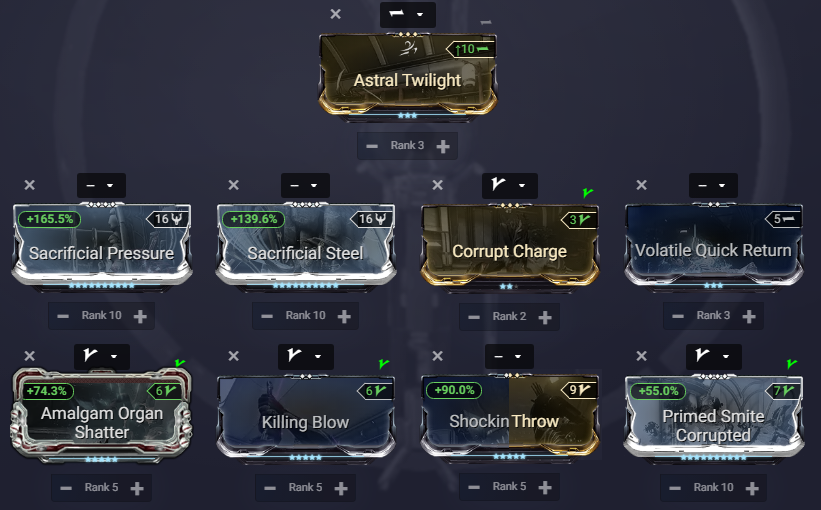 4 Forma required
Xoris and Falcor have forced Electric DoTs on their heavy attacks, which work just as well against armour stripped units as Toxin does. So for variety, feel free to use Xoris or Falcor. You can also slot Primed Fever Strike instead of Shocking Touch/Power Throw for Corrosive damage on the manual explosion, though your DoTs will be smaller.
Other glaives to try:
Xoris, with a 12x combo build - Utilising Volatile Rebound, the aim of a build like this is to throw the Xoris, and let it bounce between enemies while never manually detonating it. The damage comes from the initial thrown hit, and the automatic explosion from Volatile Rebound. This builds up combo, which Xoris maintains indefinitely, and lets it benefit from Blood Rush and Weeping Wounds. There is some preference whether you want to lean into making this build a status spreader and primer, or a main damage dealer.
Falcor - this glaive is similar to Xoris in that it has a forced Electric proc on manual detonation. It has lower crit chance but higher status chance than Xoris, and higher Electricity damage on the manual detonation, which leads to a bigger forced Electric DoT. It has a smaller detonation radius, but faster flight speed and automatic homing - so long as you throw it in the general direction of an enemy, it will hit it (this is either a good or a bad thing depending on how much you want to manually aim for heavy attack detonations). The automatic homing and higher on-hit thrown damage can also make it a good pick for a bouncing 12x build, but it won't enjoy the endless combo that Xoris does.
Pathocyst - this Infested glaive has a forced Viral proc on manual detonation, and innate Viral damage on thrown hits with good status chance. Can be used as a Viral primer.
Halikar - both this and its Wraith variant can disarm on manual detonation. It offers utility and a soft form of crowd control.
Kestrel - it knocks over and ragdolls enemies on manual detonation. Again, utility and crowd control.
Orvius - it does forced Cold procs on its manual detonation. With a "light" throw (hold down the throw button for less time than a "full" throw) it will pick up an enemy and make them hover for a short while. Some utility and crowd control, but not terribly useful.
FAQ:
Why Sacrificial Pressure instead of Primed Pressure Point?
Increasing Sacrificial Steel's critical chance increases the chance of orange crits. Orange crits are a bigger damage buff than the extra base damage of PPP.
Why is Corrupt Charge only rank 2?
At rank 2, you have enough initial combo for 2x combo multiplier. That 1 point of capacity can be the difference between an extra forma or not. Ranking it up to 3 is personal preference.
What is "Basic Steel Path"?
Steel Path up to the first C rotation, i.e. no longer than 20 minutes in a Survival.
What defines "Endurance"?
Any longer run in an endless mission, typically up to level cap. Slower scaling in missions like Survival mean you may be a few hours in and still a long way off level cap, so you can't always measure it by time spent. I'd start strongly suggesting Faction mods by enemy levels 1000+
I don't like chaining throws, do I have to use Power Throw?
Nope. Viral priming with Gladiator Might will do you fine with Glaive Prime, and Power Throw has to work harder to beat Primed Fever Strike on Cerata. However back-to-back throws with Power Throw lets you get away with less Viral priming.
Are Faction mods worth it?
For endurance, yes. Look at the number differences.
What should I look for in a Glaive Prime Riven?
Initial Combo is the most desirable stat, as if it's high enough to replace Corrupt Charge then any other stats such as Damage, Critical Chance, or Critical Damage on the Riven are an outright bonus. If you run with Gladiator Might, then Critical Damage with other beneficial stats can replace Gladiator Might instead. Glaive Prime's Riven disposition is low enough that you need to make sure the Riven's stats are high enough to be worth replacing anything else on the build.
What should I look for in a Cerata Riven?
Initial Combo, as with Glaive Prime above. Or decently high Toxin Damage, so you can replace Primed Fever Strike and have bonus stats like Critical Chance, Critical Damage, or Initial Combo. Or a high enough roll vs Corpus, so you can replace the Faction mod and have bonus stats - Cerata has a high enough disposition to about match Primed Smite Corpus, roll variety depending.
Do I need a Riven for Glaive Prime/Cerata?
No. They're perfectly strong without.
What about Infested?
Make another config and slot in their Faction mods if you have them and want to use them. Generally Infested are pretty squishy and damage output is not your concern going up against them - things like Disruptor energy drain and Toxin damage are your main concerns. However, in endurance runs, Faction mods will help a lot against Overguard.
Having seen Reap & Sow tileset nuking builds slowly starting to gain exposure and traction over the past few months, when DE announced Sev Prime, a small part of me was genuinely like "oh dear"
If people think the current Wukong slam spam is bad, they won't enjoy this :^)