diyrebel

joined 1 year ago
[–] [email protected] 1 points 3 months ago* (last edited 2 months ago)

You want to open the hot valve 100% until the hot water comes because it conserves water. You want to clear out the hot water line as fast as possible. Turning it to 70% just takes longer to heat up and you’re just dumping cold water out for no reason.

This is precisely what a thermostatic valve gives you. I don’t think you know how a thermostatic valve works. If the thermostat on the mixer bar is set at 38°C and you turn on the pressure control when the water in the hot line is cold, a thermostatic valve opens the hot 100% immediately and when the hot water arrives at the fixture it automatically adjusts. What you say about starting 70% open is exactly the problem you have when /not/ using a thermostatic valve, like the pressure balance valves that are common in the US.

(edit) also consider how tankless heaters have a minimum threshold for turning on. If you open the hot valve just a little, the heater will not be triggered. It must be open enough to trip the flow switch. It can be tricky to open the valve just enough to trigger the heat. A thermostatic mixer valve solves that.

Even a couple of dollars more for a contractor is a lot when a thermostatic valve doesn’t add any value.

I don’t think you saw the pic I posted of the cheap thermostatic mixer bar. Those can be installed by anyone because they are external. You just turn two union nuts until hand-tight then give ¾ turn extra with a wrench.

[–] [email protected] 1 points 3 months ago* (last edited 3 months ago) (1 children)

The bolts use a plastic washer and plastic nuts that slide into plastic rails of the plastic cistern. It’s really flimsy. As I tighten the nuts, I can hear the cracking sound of the plastic washers cracking internally. I’ve reinforced them with a bit of thin sheet metal but whatever I do cannot rely on bolts to add much pressure. This is also why I kind of doubt a rubber flanged gasket working even if I could track one down.

But indeed using all gummy stuff would likely work (but messy!). I’ll try it if my next plan fails.

[–] [email protected] 4 points 3 months ago* (last edited 3 months ago)

In US the most common type of seal is a wax ring.

I’ve seen those used between the toilet and the floor on US toilets. I didn’t know they also used them between the cistern and bowl. That might work here but finding one locally seems unlikely but I’ll have to look anyway.

But everything needs to be extremely rigid, any movement later will break the seal.

Well, cistern is plastic and flimsy so maybe it wouldn’t work. I’m also thinking the hard rubber gaskets might only work well for a heavy ceramic cistern.

I appreciate all the recycling tips. People around here just use them to decorate street corners without cleaning them up first. I never see them getting dumped, so I guess the city porcelain beautification project must be happening late at night.

One practical use I might consider is for the parking competition. Sometimes people try to reserve street parking by putting junk on the street in front of their house until they need to park. A heavy old ceramic toilet might work well for that as probably no one else would want to touch it to take a parking spot.

[–] [email protected] 1 points 3 months ago* (last edited 3 months ago) (3 children)

I just removed the cistern for like the 6th or so time to inspect. The gummy stuff appears to adhere very well to both the ceramic and the foam. I would be quite surprised if the water were getting between them. I suspect the most likely theory now is water goes between the foam and the cistern and over top the foam. To test this, I guess I will cut out a paper ring and place that on top of the foam and see if part of the paper gets wet. If the paper gets wet, then I’m thinking I will wrap electrical tape around the cistern down spout to widen it a bit, to get a tighter fit in the foam ring, and maybe put 1 strand of jute (rope) under the electrical tape near the top. And if that fails I guess i will put some of the gummy stuff on the top of the foam, though that will make for a mess everytime the cistern needs to be removed.


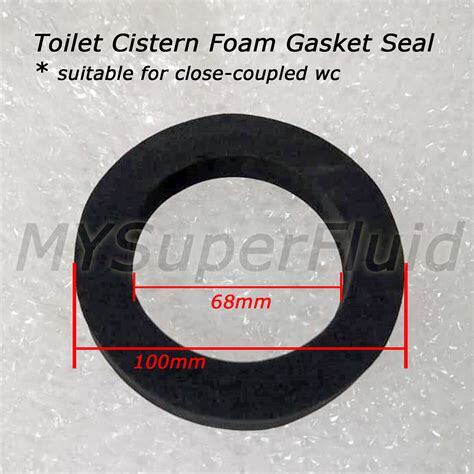
I have a plastic cistern which has started leaking, only when flushing. The cisterns in the region are installed to sit on a foam ring (~12mm thick), which serves as a gasket. The foam eventually fails. I’m baffled because failing foam looks no different than new foam. They charge €10 for these gaskets that probably shouldn’t cost more like 50¢.

I bought a new gasket and it fails as well.

One shop had some uncommon gummy play-dough-like stuff for this purpose. It comes out in a strand with about the same diameter as a sharpie marker. So I stuck that to the toilet around the cistern ingress hole. Then I put an old foam disc on top of that and pressed it down. Even that leaks. Maybe I was supposed to really pile up this gummy stuff and not use the foam ring at all.

DiY shop says “buy a new cistern for €40”. I hate that option because it rewards the same poor design and I’d be spending more than I should have to.

Fuck that.

Alternatively the standards have changed and the new design is to have a thick rubber flanged gasket. But the ceramic ingress hole in the new toilets is also 80mm (~7mm bigger than mine). So I need a whole new toilet to upgrade to the new standard. What a disaster.

Fuck that.

So I went to a rubber fabrication specialist to get the new rubber gasket design in the size of the older toilets. He does not have a 3d printer, so for the 3D thing I need will cost €1000 to build the casting mold.

Fuck that.

All pressure is on to throw away a whole functional toilet because of a failed gasket. I hope that’s the nuclear option. I’m seriously considering grinding the ingress hole of the ceramic toilet to have the ø 80mm needed to install the newer rubber gasket. Has anyone done that? I have a carbide hole saw for ø 83, which would deny me the tight fit that I need. So am I better off using a dremel with a stone bit? Seems like that will take forever and maybe be a bit error prone. Even if I make the perfect hole, the inside of the rubber flange is also bigger than the cistern output port. So then I might need to improvise something to make the cistern mate tightly with the flange.

(edit)
Another possible hack: thinking of those Victorian toilet designs where the cistern is mounted close to the ceiling with a pull chain. Those toilets still exist, I think deliberately as a retro interior design. I wonder if there is some kind of plumbing kit that would have better sealing properties, and perhaps the cistern could be just raised 10cm or so and bolted to the wall. Though if it goes wrong, the toilet could become the shower for some unfortunate user.

update: solved


I was seriously baffled. The gummy stuff seems great. I could see no way for water to pass above, through, or below the gummy stuff. The only remaining possibility was water was the flush was faster than the bowl and backing up and spilling over the foam ring. So I put a ring of paper on it and retested. Still leaked but the paper ring is dry! wtf.. no possibilities left. I spent a lot of energy on the gasket.

When I first spotted the leak, my very first suspicion was that the plastic cistern could have a fracture because I’ve had one fail in that way before. So I filled it with water and set it over a bucket. Saw no leak. Apparently I was too hasty with that test. I just tested again and there is a fracture that water is very slowly dripping through. It’s so slow I thought it could only be happening on flushes (which reinforced the false negative of my 1st test).

Anyway, the fix is just to squirt some super glue into the fracture it possible, perhaps do some plastic welding on top of that using a soldering iron and a zip tie, then maybe put a bit of flex seal tape or roofing tape on top of that.

Glad I did not take a grinder to the motherfucker. I appreciate everyone’s feedback!

update: hmm.. not so easy


I just glued and taped. Still leaks. There are 3 cracks. I think these cracks were introduced when I screwed down the cistern (plastic piece of garbage). One of the cracks spans a rail so cannot be fixed externally. The inside of the cistern has a layer of styrofoam (probably to reinforce it). So I’m ½ tempted to cut the styrofoam and squirt epoxy on the inside bottom.

Alternatively, the normal fix is to buy a new plastic cistern (price: €40). But people keep throwing away plastic cisterns simply because the internal rubber ring gets scaling buildup and they do not sell the ring. I happen to have 10 new rings. So I guess my best move is to wait until the next cistern gets thrown away.
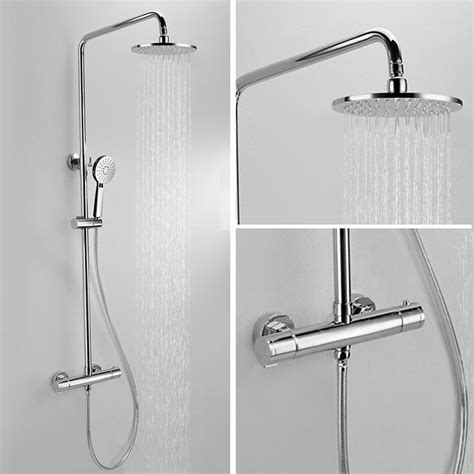
[–] [email protected] 1 points 3 months ago (2 children)

It’s bizarre that thermostatic mixers are costly in the US. I can get a new one as cheap as €25 if I shop out the sales, or probably €10 2nd hand.

Tankless water heaters are really lagging as well in the US, and absurdly costly. I’m sure that will get corrected eventually. But in Europe tankless boilers are the norm and used in combination with thermostatic mixers. The lack of tank causes a delay in hot water because it’s less instant than a pre-heated tank. The heating element takes time to fire and reach a high temp. So you are even more tempted to open the hot valve 100% until the hot water comes, which means you have to diligently readjust the valve to avoid scalding.

The luxury fix to that delay is to have a 3rd pipe that cycles the (cold) hot water line to keep it hot in the pipes. This seems quite wasteful and complex so I wouldn’t want to install that.

[–] [email protected] 1 points 3 months ago* (last edited 3 months ago)

I’m riding in all seasons and often get caught in the rain. The chain has stopped slipping. So I’m not sure what was going on to cause slippage for a week or two but it corrected itself and so I’m still getting mileage out of it.

[–] [email protected] 4 points 3 months ago

The thermostatic mixers can get as cheap as €25. Though I think the cheap ones have a degree of slippage, whereby mid-shower I have to increase temp. I don’t know if that’s because it lost track of my setting, or if I adjusted to the temp physiologically and need hotter water to psychologically feel the same level of heat.

What kind of bothers me about the pressure balance design is you cannot tell from the pics if it’s really pressure balanced. I think the one handle style goes back decades, and originally did not maintain a balance. You have a joystick of sorts but if the pressure on one pipe changes you don’t know if it internally balances to maintain the ratio. So you have to read the product description and trust it.

[–] [email protected] 3 points 3 months ago

Yeah, kind of. I’m glad to hear they have that capability. But note that there are some non-thermostatic designs that come close to achieving the same effect. Those have a memory of sorts, where they know you want X volume of hot water and Y volume of cold water. Then if the pressure in one drops or increases, the valve will adjust the other line ensure the hot and cold have the same ratio regardless.

That’s pretty good. But it assumes the hot water and cold water are each at constant temps. So imagine if you get to near the end of a hot water tank supply, the hot water will gradually become colder. In that case, a thermostatic valve will open the hot even more to chase the temp you want. Whereas the pressure balance style will not. Perhaps more importantly, the pressure balance style does not counter the fact that the hot line will be initially cold since the hot water cooled down while sitting in the pipe. So you have to fiddle with readjustments until the hot pipe is maxed out.

[–] [email protected] 10 points 3 months ago* (last edited 3 months ago) (1 children)

You have two controls, 1 for temp and one for pressure (instead of the traditional hot and cold with independent pressure controls on each). The temp knob has a stop in one position as you turn it, which gives 38°C water. The cheaper models are external and use a wax cylinder inside:

Wax expands as it gets warm. So when you first add pressure, internally the hot water valve is 100% open. Then as the water gets hotter at the valve, it closes and starts letting cold water in to retain the temp you select. It reacts quite fast too, so even if you have screaming hot water arrive at the fixture it’s quick enough to protect you from scalding. You set it and forget it. If someone else in the house flushes a toilet or runs a washer or dishwasher, thus causing the cold water to lose pressure, the thermostatic fixture will automatically adjust to maintain the temp.

The pricier ones are internal, which means all the complex valves are buried in the wall. And instead of wax they use a bi-metallic mechanism (which exploits the fact that a couple diferent metals bend differently with temp, or something like that). They look like this:

I think that has 2 pressure knobs, one for rainfall and one for the wand.

Whole external kits with rainfall and wand start at €100. If you just want the mixer bar and wand, it can be as cheap as €25. The internal kits start at around €500. I like the external ones not just because they are cheaper, but the plumbing is simple. You just need to have hot and cold threaded ½" pipes sticking out of the wall 15cm apart, which the fixture can screw onto.


I just visited some web galleries of bathroom remodelers in the US, and it looks uncommon to have external shower fixtures. They tend to bury as much of the fixture as possible in the wall. From the photos, I don’t get the impression they are using thermostatic mixing valves. But it’s hard to tell. Can anyone confirm or deny?

I think I might favor external fixtures because they tend to be much cheaper and also more easily servicable.

[–] [email protected] 1 points 3 months ago* (last edited 3 months ago)

I appreciate the suggestion but that luxury option sounds way more complicated. Adding a thermostatic mixer under the sink needs no pump or electrical wiring, and does not need a third water pipe to go from the faucet back to the boiler. It’s just plumbing under the sink. And in my case, I happen to have spare thermostatic shower mixers so I would just be buying a couple fittings.

I would perhaps even sooner put a small electric tankless water heater under the sink, which would require just one water pipe rather than 3.

I think there’s even a compromise where an electric insti-heat gadget can be plugged into the hot water line to give instant hot water, which I assume shuts off when the hot water actually comes.

[–] [email protected] 1 points 3 months ago* (last edited 3 months ago)

I’m afraid you misunderstood. The leak in all scenarios is in the same place - water enters a room two rooms over from the bathroom. It’s unclear whether it’s seeping in around the showerpan or walls.

[–] [email protected] 1 points 3 months ago (2 children)

That’s a different kind of leak. A leaky valve isn’t my issue. But indeed it is nice to have replaceable cartridges so when a valve goes bad it does not require digging up the wall and replumbing.


Wondering if anyone has done this.

I have converted my showers to the external style of thermostatic shower valve. Made a huge upgrade to showering UX. Why not do the same for bathroom faucets?

It seems the same benefit could be had with the bathroom faucet, but no bathroom faucets in local shops have this capability (I didn’t check online nor would I shop online). So to wash my hands (or whatever), I start with full blast hot water to get the hot water hurried along the pipes. Then of course it can get screaming hot soon enough and I have to adjust the valve in the middle of what I’m doing.

So the hack I have in mind is to install a mixer valve that is intended for showers. It can be installed under the sink with the output of that going to the hot input of the faucet. Then when I put the faucet on full hot, it opens the hot input 100% just until the preset temp is reached, at which point adjustments are made automatically and instantly. This would give warm water as quickly as possible. If I really need screaming hot water for some reason, the mixer under the sink can be put on full (although I think I have to accept that those probably still have an upper limit).

21
submitted 4 months ago* (last edited 2 months ago) by [email protected] to c/[email protected]
 

As house problems can manifest in many ways, I recall reading some basic advice “if water is ending up in the wrong place, it’s in the plumber’s domain”.

Exceptionally, if water appears on the ceiling of the top floor, I would skip the plumber and call a roofer. But what about showers?

This is a bit of a mystery:

A shower is leak is manifesting two rooms away from the shower. It’s clear that the shower is the source of the leak because water only leaks when the shower is running. The plumber claims to have fixed the drain pipework. But it still leaks, just at a very slight trickle or drip. So apparently the pipework was leaky and the fact that it’s significantly less water leaking means there is still another problem. Plumber made a 2nd visit and claims the new pipework is solid up to and including the drain, and makes a vague statement: “replace the shower pan”. When someone stands on the showerpan while showering, water leaks at a higher rate. The shower pan flexes when standing on it, which suggests that maybe the bedding is rotted wood due to the leak. We put wood planks on the shower pan to prevent the showerpan from flexing while showering. That reduces the leak. But the leak is still there. I wonder if water is hitting the outside of the drain pipe and clinging to the drain pipe due to water tension, and running along the outside of the pipe until the pipe takes a turn 2 rooms over. I can only guess.

The shower pan itself has no holes. We will redo the silicon caulking around it in case the leak is around the sides.

Anyway, I don’t want to get too far off into woods with speculation. I’m mainly just trying to work out: is the plumber competent? Are plumbers expected to accurately diagnose this sort of thing? Or are plumbers only responsible for pipework and water penetrating walls and showerpans is beyond their expertise?

It’s hard to find good plumbers and I wonder whether I should call this plumber back in the future.


There are a lot of mixed messages about plumbing with dissimilar metals. Mainstream local plumbing shops sell brass manifolds. They say I can connect the brass manifold to steel pipe. Copper is very dissimilar to steel, and fittings for copper are brass. So if it’s okay to connect brass to copper and brass to steel, why couldn’t a copper pipe be connected to a (steel) hot water tank simply using a brass fitting? It’s supposed to be a dielectric fitting that insulates using rubber so the metals don’t touch.

OTOH, there is a gas-fired tankless boiler with internal copper pipe and a professional directly attached those copper pipes to galvanized steel pipes. Youtubers say copper should never join steel and they show examples of corrosion.

The question at the moment is whether this is a good idea:

galvanized steel pipe → brass manifold → galvanized steel pipe

I can get brass that is nickel plated externally, or it can be simple brass. The nickel-plated manifolds have integrated PEX valves. If one valve goes bad, then the whole manifold needs to be replaced as a single piece.

Shouldn’t the manifold also be made of galvanized steel? I wonder if it’s worth it to go on a hunt for something that’s uncommon.

#askFedi


cross-posted from: https://lemmy.dbzer0.com/post/12359577

There are a few youtube videos where someone suggests using sulfuric acid to clean a secondary plate-style heat exchanger (for example). Yet I’ve heard sulfuric acid is extremely corrosive to metal, so something seems off about that advice. I certainly would not want an internal leak to cause radiator fluid to enter the tap water. I saw a drop of sulfuric acid land on a galvanized steel pipe once and within minutes it was rusted on the spot.

This guy also says sulfuric acid is an option but also says there is a safer alternative acid -- yet he did not mention what it is! Does anyone know?

This guy says he uses an ultrasonic bath but he does not say what chemicals he uses. Would distilled white vinegar be good for this?

Note these questions are very loosely related to this thread which describes a problem I am having, but really it’s a separate discussion. Secondary exchangers need periodic maintenance regardless of whether this is my current problem. I saved my previously clogged heat exchanger from a few years ago so I could work on cleaning it. I have a quite small ultrasonic I could try, but I cannot submerge the whole exchanger. I would have to stand it on end and only clean a few centimeters deep.


My #Vaillant combi-boiler was working fine for both central heating and tap water, then suddenly there is no hot tap water. These are the clues that seem to imply the secondary heat exchanger would NOT be the problem:

  • radiators heat up fine, which I think must prove the radiator side of the secondary heat exchanger is clear (OR does the secondary heat exchanger get bypassed when central heat runs)?
  • the “hot” (cold) tap water flows with good pressure, which seems to suggest the tap water side of the secondary heat exchanger is probably clear as well.
  • new secondary heat exchanger was installed in February 2019, which would be unlikely to clog this early.
  • when I last showered the hot water was good and continuous. In 2019 when an exchanger clogged shower water would alternate between hot and cold. But in the case at hand I had solid hot tap water one day and not the next.

When I turn on a hot water tap, the boiler LCD should normally show an icon of a faucet to indicate that it has switched to tap water. That is not happening. Even if I turn off the central heating by turning the dial to the lowest setting, the boiler never switches to tap.

The guy in this video says it’s normally the central heating side of the secondary heat exchanger that clogs. Does anyone concur with that? Seems unlikely because the radiator circuit runs the same water through which has inhibitor. The tap water side would have new quite hard water constantly passing through the tap side of it.

There are no fault codes displayed when I press the “i” button for information. What a likely issue?

I guess this question might be important:

  • Does the secondary heat exchanger get bypassed when central heat runs?

After some thought, I suspect bypassing the heat exchanger would be important, otherwise it would heat the tap water sitting still in the exchanger and cause unwanted pressure, correct? If that’s the case, it makes me think the radiator side of the exchanger could be clogged. But then I guess that does not explain the tap water icon not appearing on the lcd. When I turn on the tap, I hear no solenoid switching sound like I used to.

UPDATE

This morning the hot tap kind of works with the thermostat off and after letting water run quite a long time. The tap water icon appears somewhat chaotically, flashes every couple seconds (not sure if that’s normal). For the first couple minutes the status rotates between these undocumented status codes: 11, 14, 17. What do those mean?

The burner ignites for a second then quits (status 14). Like a car starting to rev but giving up.

Over the summer I drained the whole radiator system, flushed about ½ the radiators, and refilled with water and added the inhibitor. Just yesterday I added water to increase the radiator pressure. There is no filter on the radiator circuit. I wonder if my maintenance would have caused sludge to end up in the heat exchanger.

Then I turned on the heating and the tap water was shut out again. The status sequenced like this:

  1. (status 4) heating mode: burner on
  2. (status 5 undocumented)
  3. (status 7) heating mode: pump overrun
  4. (status 8) Anti cycling mode (after heating operation) ← what is that?
 

I’m seeing a contradiction on chain cleaning articles. One dodgy site says:

It is essential to avoid some common mistakes when cleaning a bike chain. Firstly, be cautious not to oversaturate the chain with degreaser as this can lead to damage or corrosion.

Then another site says to remove the chain and submerge it in degreaser.

The first site seems dodgy, like one of these machine-generated sites that scraps together fragments of other works and plagurizes it in a clumsy way. But is the advice good? If the chain is 100% degreased, when you oil it wouldn’t the oil eventually spread everywhere it’s needed?

The 2nd article says remove the chain. Yet I’ve heard advice to not re-use quick-links. So WTF are they implying we need to buy a new quick-link every time we clean it? If yes, then removing the chain defeats the cost effective motivation for cleaning it in the 1st place.

Maybe this is crazy talk, but one idea I have is to leave the chain on the bike and submerge just the deraileur into an ultrasonic bath and very slowly move the chain through it. Not sure if my deraileur has ball bearings.. if it does, then indeed the ultrasonic would be a bad idea.


I replaced the whole drivetrain 23 months ago (cassette + crankset + chain all at once). I bought the cheapest new parts I could find which came out to 5 local Big Macs on today’s McDonald’s index (in total).

The chain has started slipping every time it rains. I don’t blame the rain I just suspect that it’s reaching the end of life and the water just puts it over the edge enough to slip. I assume it will soon start slipping in dry conditions as well, correct?

Can I do much better than 2 years?

I somewhat abused the chain. Added proper oil every ~2 weeks but never cleaned it. There are lots of unsupported claims in the wild that cleaning the chain substantially increases the longevity. Okay, sounds plausible but I’ve seen no stats. If a weekly cleaning (thus 104 cleanings) would extend the drivetrain’s life by a couple weeks for example, that’s not worth the effort. So does anyone have any figures, even anecdotal?

Guess I should mention this is urban city riding, not trail, so presumably cleaning would be less impactful. And I’m not a serious enough rider to need high performance.

I’ve also heard the sprocket and cassette should be replaced every other chain replacement. Is that good advice? So I only need to replace the chain at this point?

Is it just the chain’s life that is shortened by not cleaning, or are the gears also significantly worn down faster?

1
submitted 8 months ago* (last edited 8 months ago) by [email protected] to c/[email protected]
 

cross-posted from: https://lemmy.dbzer0.com/post/10839711

A top-floor room that’s not currently used has mold from excessive dampness. For a month I have been running a dehumidifier as it’s too cold to open the window.

Is this a good idea?

My concern: I heard about running a dehumidifier long-term in a damp basement is a bad idea because making the air more dry than the wall causes moisture to continuously flow from the outside in. That flow supposedly has the effect of washing the masonry through the capillaries and causing it to break down and weaken. In my case it’s not a basement, but similar because the exterior wall is non-stop wet from the frequent rains (possibly even leaky.. i think water seeps in).

I have the humidity set to 55%. I wonder if there is an optimum setting that would inhibit mold without overly causing water to flow through the wall (which is very old brick+mortar and rendered over on both sides, no insulation).

BTW, the water collected in the dehumidifier looks clean. Is it good for drinking?

6
submitted 8 months ago* (last edited 8 months ago) by [email protected] to c/[email protected]
 

A top-floor room that’s not currently used has mold from excessive dampness. For a month I have been running a dehumidifier as it’s too cold to open the window.

Is this a good idea?

My concern: I heard about running a dehumidifier long-term in a damp basement is a bad idea because making the air more dry than the wall causes moisture to continuously flow from the outside in. That flow supposedly has the effect of washing the masonry through the capillaries and causing it to break down and weaken. In my case it’s not a basement, but similar because the exterior wall is non-stop wet from the frequent rains (possibly even leaky.. i think water seeps in).

I have the humidity set to 55%. I wonder if there is an optimum setting that would inhibit mold without overly causing water to flow through the wall (which is very old brick+mortar and rendered over on both sides, no insulation).

BTW, the water collected in the dehumidifier looks clean. Is it good for drinking?

view more: next ›