410757864530_dead_follicles

joined 5 months ago
[–] [email protected] 12 points 2 weeks ago

honestly the process is so beautiful i wouldn't trade it for the world meow-hug

that said I'd love a little break from time to time 🥲


heyyy friends meow-hug

It's been longer than I wanted it to be, I've had a hard time lately, everything from work stress to coming out to my highly conservative family to some particularly nasty dysphoria, had me cruise right into a nice little light to moderate menty b - I'm fine, it was a growth opportunity, sometimes you just indulge these things and get in your car and drive with the music up real loud and hop out somewhere you can watch the sunset and you cry alone for a while and you savor it and you come out of it cleansed. I'm good. Being a girl is hard. Still figuring it out. <3

This is a light update in terms of work I've accomplished but it's a big update in terms of how this project becomes something more community related. the title of this post is actually a double entendre, you see - not only do I have issues, but the sphynx project also has an issue tracker. berdly-actually

Issue tracker for sphynx (the electronics): https://todo.sr.ht/~_410bdf/sphynx?search=status%3Aany

Issue tracker for sphynx-site (the website, both content and style): https://todo.sr.ht/~_410bdf/sphynx-site?search=status%3Aany

This changes a lot. I've been stressing with each post about ways I can ask y'all for help, because I 1) want to take some of the load off of myself, and more importantly, 2) turn this into a truly community project, where people all across the world leave their mark and have this be something we do as together as we can. Now that I have an issue tracker, I can start unloading my brain asynchronously from these posts, providing all the information in a neat compartmentalized fashion per issue, and teeing things up for community members to take on. It also serves as a great work journal, I still make, comment on, and close issues that I work alone, so it's a good place to check in to see that I'm still doing things (even though it's been a minute kobeni-sweat)

I've done some electrical work since last post too, pretty much just bug fixing and improvements from RC1, and if you'd like to read about it, it's all (albeit very tersely) captured in the issues! Go dig around and have fun!

The site is a little fresher too! Just a bit, it's still not inhabitable yet, but we're getting there. https://sphynx.diy Huge shoutout to @[email protected], it put in a really a lot of work and sent me more than a few patches, including fixing some bugs I had spent kind of not a little time on, plus, of course, doing the entire original Jekyll port and the entire original CI pipeline. You're real for that, thank you trans-heart

OH! And message me on matrix??? @410bdf:matrix.org say hi! I love hearing from y'all! Or say hi here! Huge shoutout again to @[email protected] for reaching out on Matrix and talking with me and hyping me up and talking about the project together with me!

Not much else, this is a quick one to let y'all know I'm still alive and to share out the issue tracker so I'm more confident to ask for help and have it be effective. As usual love y'all. I've been using RC1 and it still works but it's only getting better from here. Byeee 🫶

[–] [email protected] 2 points 2 weeks ago (1 children)

hello! I'd love to talk through it, but the very short answer is that this is fully global as designed. It runs on 2 9V batteries and is never connected to the wall at any point. Batteries are consumable and it's a little bit of a bummer (these exist which mitigates this issue!) but there is a safety risk with having any direct electric line from the wall to a person. I trust my engineering skills but even if I feel like I could make it safely, it's not worth the risk. If my circuit completely fails and the batteries shoot straight through to the recipient's body, it's just 18 V and it's a little ouchie but no big deal, unlike with wall current, which is a very, very big deal. I would never endanger trans. <3


Hi comrades! I'm back! Sorry for the delay! I've been keeping busy, with this project, with work, and with getting familiar with a new town. This update is fun because it's actually entirely devoid of electrical engineering nerd shit! Since last update, I've focused on two things - getting the framework of a website together, and actually getting usage hours on the device so I can know how it handles, what it's missing, what it does well, etc. I'll break this update into those two sections.

Device usage

I think I have about 5 hours in the device so far, with I'm guessing a couple thousand or so pulses. I've tested my face, eyebrows and beard, I've tested my hands, I've tested my arm, I've tested my leg, and I've tested my chest. The general routine is as follows:

  • Get clean and get comfy.
  • Get all the peripherals in order and get the board set down somewhere stable. For me, this is getting good direct bright lighting, getting the foot pedal in a good spot, getting a clean (or at least clean_ed_) probe in the probe holder, getting the return electrode connected [1], and for some work areas, particularly with vellus hairs, getting a magnifying headset on.
  • Dial in estimated power levels. The thickest and darkest hairs I've tested on like about 2 mA at whatever voltage it takes to feel the burn, usually >= 10V, and pulsing for the whole 10 second duration. I've gotten facial hair kills at 1 mA/6 V/6 seconds, and vellus hairs on my hands can typically take 0.5 mA/6 V/5 seconds. These are determined by trial and error and I almost always fiddle with them multiple times in the middle of a session; there's no rigorously defined science besides the Units of Lye calculations, which are very loose. More current leads to faster kills but it hurts more and it's easier to accidentally overdose and get a hyperpigmentation scar. I've never managed to do this accidentally, only on purpose, see below.
  • Put in the probe and hit the pedal. Wait out the indicator light [2], feel for the burn, and at the end of the pulse, pull out the hair.
  • Repeat!

Some areas are clearly not regrowing, others, it's too early to make a call, but I'm pretty confident that it'll be minimal, possibly even better than salon electrolysis, due to a number of advantages to self-work that I'm finding that I'd love to detail here. There are some cons too.

  • pro: you can feel the power. You very quickly get a feel for what a good follicle kill feels like. A well killed hair will cause a burning sensation strong enough that it lasts for a few seconds after you stop applying current. You can also feel overkill - I did this a couple dozen times to experiment, the follicle isn't any deader than any of its neighbors, but one or two of the deliberate overkills has what appears to be a hyperpigmentation scar that looks like a freckle. They're already fading, but they might be permanent and might not. I have never accidentally overkilled but it's definitely possible to do so, especially if you have a healthy appetite for pain and/or are working impatiently. An overkill probably takes at least 3 times the current*time that the minimum safe kill does, so it's not super close.
  • pro: you can feel the pluck from both sides. I do have minimal testing on another person and feeling the hair pull on one side is helpful (a dead hair slides out with a pretty constant slide, a live hair tends to hold on and hold and hold and then break loose all at once). However, when you're both feeling and plucking, you can feel for the signs of a killed hair more effectively - killed hairs tend not to hurt on the way out and you can give them a light test tug and not feel it. A hair that hasn't been killed will hold on and cause a little bit of pain with a test tug, allowing one further way to check your kills. I strongly recommend both parties having experience (just a couple hairs) on both sides when doing co-work to foster this kind of mutual understanding that allows for better communication.
  • con: obviously you're not getting a lot of your body. You need a friend to get everywhere, particularly a lot of the spots that are really important. My biggest issue has been trying to self-work my neck. It just doesn't wanna go, the angles do not hit. I believe it's an area that will be possible with more practice and dexterity, plus a smarter setup - I'm going to try a mirror setup to see while lying on my back, but it's frustrating. :angery:
  • con: fatigue. When you're working on someone else, you can get comfortable. When you're working on yourself, you're very often uncomfortably contorted. This poor ergonomics greatly shortens session time and poses an issue for our comrades with disabilities. My DIY sessions usually last an hour tops; I have some pain issues in certain positions and this does NOT help.

I also have some notes on equipment:

  • [1] - I had a good idea that I'm a thousand percent recommending for self work. Salons typically use a holdable piece of metal for the return electrode. I am using an ECG electrode. For partnered work, this is nice because it allows your recipient to get more comfy and do things with both hands, but for self work, this is almost indispensible - it lets you keep both your hands free. I'll put instructions for making and working with both on the website.
  • [2] - Visual cues suck. You do not take your eyes off of the hair for the whole cycle. I initially had the lights hard-wired and the buzzer switched - the lights absolutely should be switched, they're not useful most of the time. I'm working without a buzzer due to the soldering mishaps in the previous post and it sucks, the beep cue is almost certainly a thousand times more useful.
  • Pedals are great for a salon-like context of a laying recipient, a seated operator, and personal space. For every other configuration - standing in front of a mirror, laying on the couch next to your bestie, etc., you probably don't want a pedal as much as you want a hand switch or a bite switch.

This isn't all inclusive, but I'm definitely happy to get thoughts down prior to starting work on the manual! which leads us to...

The Website

It's on jekyll now! We're finally ready to start hosting actual, real content there! So, so many thanks to @[email protected] , who actually single-handedly ported the old single page splash screen to Jekyll and on top of that pushed out a bunch of fixes for my sloppy half-assed jekyll code. I really, really appreciate you, you're genuinely helping both to motivate me by both making indispensable contributions, and also just by being a person out there in the world doing this with me. trans-heart

The appearance and organization are both super preliminary, and there's not any actual content, and the design is also very much a prototype. The important thing is that now I (or anyone else!) can just write markdown and have it reflected online in an easily readable and shareable format. Email patches are a great way to get both code and content on the page, I try to review them at least twice a week or so. Now that things are set up, it's extremely convenient to put content up. I think to pilot the website, I'm going to make a more formal tutorial for the pencil based probe to start. The one I made per @[email protected]'s instructions is still doing phenomenally, thank you for your research and development. Similar thanks for being a part of the project in a meaningful way and making this a team effort. trans-heart

Come take a look! https://sphynx.diy

What's Next

So the project is hitting a bit of a fork, where we finally have multiple parallel work streams at a time - the online manual needs to be designed/written, and the RC2 version of the PCB needs to be designed and ordered. I have a list of changes from working with the RC1 that I'll be rolling in, that'll be the next post. I'm also going to start using https://todo.sr.ht to track issues, both to keep myself organized and to publicly advertise what we need to get done in a neat encapsulated way. I'll have details for that up on an #8.5 post in a couple days. For now, honestly I feel bad for drastically overrunning my two week timeline and leaving y'all in the dark for so long, so this post is going up ASAP. I've been busier than usual and probably busier than I plan to be in the future, so I'm more optimistic for a timely #9 post, although that may be in three weeks and not two due to some plans of mine.

I love y'all. RC2 might be the release. We're just weeks away from other people benefiting from this project materially, it's just refinements from here. Thanks for the support, and you know the drill, stop by, say hi, ask questions if you want to understand things better, make suggestions, all of it. See ya next time. kris-love

[–] [email protected] 2 points 1 month ago* (last edited 1 month ago) (1 children)

hi! Perfect timing, I just sat down to conclusively definitively follow your instructions to get this patch implemented and then set up CD onto https://sphynx.diy. I'm honestly not opposed to you having push access to a branch, but I just have to get settled into the repo first and reacquaint myself how Jekyll projects are typically organized. I'll let you know when I'm up to speed with where you're at and then there's a good quantity of site things to be done 🥰

edit: holy shit patching with eml files is easy I don't know why I was dreading this so much. 4 minutes. The CD job failed, I didn't really expect it to pass on the first try, but I'm going to go into debugging that now

edit 2: i fixed the build script chicken-bop I went down a somewhat (entirely) unnecessary rabbit hole of getting bundler installed as a user gem instead of as a system gem for the problem to be totally unrelated and just be system binaries anyways. Might change it back, might not. The important thing is that pushing jekyll automatically uploads HTML to the site. I can finally start writing blog posts and guides and stuff. Thank you :meow-hug:

[–] [email protected] 3 points 2 months ago (4 children)

Hi, I'm gonna bang my head against this for a bit! No need to look for matrix replies or anything, I'm going to work on it solo for now because of timezone reasons and also because I'm more in the state for casual work and not intensive, active work. I'll let you know how it goes. Thank you for your help <3

[–] [email protected] 7 points 2 months ago

hi! I sincerely hope it has that level of impact, if I can meaningfully improve - let alone save - one girl's life, it'll have all been worth it ❤️

as for the tip jar - I'm an engineer in the imperial core, I truly don't need the money. If anyone here wants to thank me, give whatever you were going to give to me to elevated access or another trans-related charity, or to people in need in Palestine, Congo, or another anti-imperialism struggle close to your heart. If you want to thank me and you don't have the money, just pay it forward and use my hardware, once it's released, to help make life a little easier for another trans girl. cat-trans


it's in and it's built and it FUCKING WORKS, at least like 80% of the way - I haven't fully put it through a full round of testing yet but every single functionality I've tested - including things that were first-time builds that I hadn't prototyped yet, like the adjustable LDO on the output and the double schmitt trigger falling edge detector, all seem to work! I even splurged a little bit and got some trans knob caps trans-heart .

What I've been up to

I don't know what to tell you, read 'em and weep. The board is built, you see it, it goes hard. Pretend my soldering isn't shitty and I cleaned the flux off. duck-dance

Full list of things that work:

  • Output voltage control knob works, tested open loop (top end is supposed to be 16 and it's closer to 15.5, I might just not worry about it.)
  • Output current control knob works, tested through a 1K resistor.
  • Timer and knob work from 2 to 10 seconds.
  • Lights work*, although I think I killed the 555 timer by soldering near it with the board powered yikes-1yikes-2yikes-3. It worked great for a few minutes and then I soldered in S1 and it stopped working.
  • Foot pedal and probe work.

I don't know if it has any new bugs when specifically connected to a human being. I suspect that if I were to try to use the current sink on the low side of the probe, which I'm bypassing right now, it'd be whacky - I never made an effort to resolve that bug, and I think I might just descope that to get this thing done at all. I'm already longing for a fresh start on some things that I think I can get by launching into the microcontroller-based version of this. There are already enough redundant safety measures in place for me to feel comfortable, although I'd really like to test the JFET current limiter, which I didn't populate because I couldn't source a good JFET and I also couldn't be assed to determine the correct resistor value. I'd really like either that or a current limiting diode on the high side of the amplifier before I call this done. That's going into the next rev. There are also some non-breaking bugs that I still need to design out, like for example I designed in 20K potentiometers for the current and time control, but Alps Alpine only makes 20K potentiometers in audio trim, meaning the knob angle isn't really one to one with the output. I need to replace those with different values. Other little things like that too.

Next up

I'm going to work with the board for a bit and see how it handles! I need to get some hands-on time with it to truly learn how it works, what it's missing, and what I need to change. I'm also kind of just looking to reap the benefits of this thing personally to be honest, I'm getting really tired of shaving angery

(plus i'm meeting some girls who are kinda into this thing and might wanna go hour for hour on some mutual aid electrolysis time over comfort shows and snacks on the couch crush shy)

I think the "alpha" model of releases was a mistake. Because of the nature of hardware development, I think I'm going to change to a "release candidate" model - it makes it clear that any RC board isn't ready to be used, and it allows me to promote any one at any time once I've designated it good enough. So, I'll begin work on RC2 once I'm deeply familiar with this board!

I'm also deeply neglecting the site, mainly @Edie's jekyll port that I really deeply truly appreciate and I never figured out how to apply the patch for. I'm sorry friend 💔 Can you work with me to get that patch applied? I tried to tackle it on a super low executive function day and I just made so little progress applying your patchset and I wanna have it up so bad but it was fighting me and I needed rot time and I quit trying after like twenty minutes kitty-cri-screm

Any ways to help?

There are kind of a few things actually! In no order of priority, with loose guesses at difficulty:

  • Getting the library I'm using updated with 3D models. It's not super necessary but having cute renders is always cool, and it'd be handy for anyone who wants to design an enclosure. Not hard, not easy.
  • Fixing some of the footprints, particularly making sure all the knobs look the same, making the font nicer, etc. Not super easy.
  • Doing a JLCPCB cart catalog audit. I think I'm close to everything being in JLCPCB's catalog? I'm not sure though! If there's anything missing I'd love to know so I can try to design it out in RC2! Kinda boring but not too difficult.
  • some more?? i'll edit them in in the morning i'm up LATE

If any of these things sound like a thing you want to make an attempt at, let me know! I'll work with you to get you started.

sloppy post today, this is deeply not accessible for non-technical audiences and leaves a lot out, so please let me know if you want deeper explanation on anything and i'll add detail! I just wanted to make sure i got my post up to let you know I'M STILL FIGHTING BABY kris-love

i'm still very not settled with the move, and burnout is closing in with my job and my new trans social life, but I'm at equilibrium, I'm okay to keep spending the amount of time I am on this, but I wish I could be spending just a little more. Life is okay though. Great, even. meow-melt


As always, stop by, hang out, say hi, ask questions, tell me what you've been up to, design review me, however you'd like to be involved is good by me! I'll see you in the comments 🥰


cross-posted from: https://hexbear.net/post/2679948

things are HAPPENING besties trans-heart


hello comrades! It's been a minute! I'm back with my first tech update since upending my entire life and getting re-settled! Let's talk meow-coffee

What I've been up to

See for yourself, pictured is the first alpha of the Sphynx Lite. Schematics are on git, go check it out (and if you want to set up KiCAD to view or edit but aren't quite sure how, say so in the comments and me or someone else will help you out!)

Issuing guidance on the usage of these things is complicated. I'm always going to be a little apprehensive recommending that people use this, because I'm a very cautious person. For now, I think my official guidance is:

  • you should understand the circuit
  • you should have basic debugging equipment
  • you should have the time to work with it extensively
  • if you meet all of the above, I provide this with no warranty and no guarantee, knowing you full well have ideas as to what you might want to use it for
  • If you have a decent working knowledge of electrical engineering and want a walkthrough, I might make a Matrix so I can actually communicate with people looking to get it going??

As it gets more mature and I revise and revise until I drop the alpha, I'll trust it more.

This was a push across the finish line. I optimized for getting something testable done with the correct topology, layout is a little dicey (cut off silk screen in the bottom right kitty-cri) and subject to change, I just needed something to test on. I was gone for over two weeks from my last post here, mainly because it was just a lot of work with nothing intermediate to report. But now it's here! This has all the working parts of the last boards merged into one, with the new additions of:

  • power conditioning
  • 9V battery holders
  • additional safety measures, like the redundant current limiting JFET
  • configuration jumpers! and test points!! !!!

Oh, and I whipped up a cute lil logo. :3

Schematics

schematics in here

Board Layout

board layout in here

Board Renders

board renders in here

Next up

I have a lot of really good work from y'all that I need to capture and incorporate. Particularly, my immediate plans while this board is fabricated and shipped are to:

  • Incorporate @[email protected]'s patchset porting the site to Jekyll - really thank you so much for this, I've been extremely focused on the board, and now that I have a minute, I can get the site going so I can use it to show off, post guide, aggregate educational resources, etc. This is going to be absolutely necessary for the project to have the reach and accessiblilty I'm hoping it gets. Thank you. meow-hug
  • Build a probe per @[email protected]'s work into coming up with a probe holder. I have a handful of the Yasutomo's to experiment with. This is going to be a game changer, currently I'm doing self-work with an alligator clip and it's extremely irritating. An ergonomic and reproducible probe with an extremely cheap parts list is critical for the project to function. Thank you. meow-hug
  • More of you provided meaningful help than just these two, these are the two who's work I'm directly interacting with this minute. Thank you to everyone who has stopped by and made suggestions, I've read them all. meow-hug

The next post will be me building this out and reporting on how well (or whether) it works, and documenting changes for the Lite Alpha 2.

I also badly need to make a BOM. With some effort, anyone who's built a board together can buy all the parts for this and make one, but it'd be a thousand times easier if I just made a single cart that you can buy that includes every single component. If you want to make an alpha board for fun or debugging, maybe hold off until I have that out.

Any ways to help?

Honestly, those of you who are following this pretty closely have a good read on what's going on, what's needed, and what's upcoming - keep being interested! If anyone wants to make one, I do recommend waiting until I release a BOM, but very soon we miiight be at the point where other people besides me get one of these in their hands.

I could also use some polish on the logo. It's fine, but it could be cuter, and the lines are a bit funky. I'm going to put SVGs on git soon and if anyone feels like cleaning them up, rearrange the kitty cat face so it's cuter, fixing my wonky paths, let me know!

Also, and I simply cannot stress this enough - when I've been exhausted, when I've been deep in executive dysfunction, when I've been not feeling up for it, I've read through all your encouragement and support throughout the duration of this project and it's helped me to keep pushing. I would unquestionably not be this far without y'all. Thank you all so much. trans-heart


As always, stop by, hang out, say hi, ask questions, tell me what you've been up to, design review me, however you'd like to be involved is good by me! I'm thinking I want to make the expected cadence of posts once every two weeks, just because I'm busy and I don't want to cause alarm when I miss a week. I can always surprise y'all with more frequent posts too.


P.S. - I have no hair regrowth in test areas. meow-melt


Hi comrades! I'm ✨relocated✨! I just unpacked my project stuff a bit ago and powered up the boards and tested them out to see that I haven't forgotten everything! we're back! soviet-playful

Instead of jumping right back in with what I was doing (partly because I had some process issues and partly because I'm still kind of reeling from the moving/new job stress), I'm going to take the rest of this week to regroup a little bit and figure out my strategy on how to make the best progress on this moving forward. Since I'm a dirty labor aristocrat now, I need to do a little bit of shopping to identify what I was kinda scraping by with that could be done faster with better consumables and tools like actually buying a real set of breadboard wires and scope clips and stuff instead of dealing with the few bent up old ones I'd found laying around. I'm also gonna rework the boards into something a little more functional for test, I'm missing labels and spots for jumpers and I learned newer and better design practices through this and I'm just all around ready to do better than I have been before (shoutout to test points, you know who you are, i appreciate you more than you know for bullying me about this)

here's a pic of my current test setup:

as you can see, I'm working on a folding camping table with slats - not great but fuck it we ball. I do have a 4 channel scope now though! In the fifteen minutes of fucking around I did with the scope, I learned more than I did in several hours of banging my head against the problem with a multimeter, and that's probably like the best thing that's happened for this project yet. No conclusions yet but it's only a matter of time.

I'm not back in full force yet but I'm getting back the momentum I lost and then some. Hopefully I didn't lose y'all and hopefully I catch some new folks now that it's been some time and new comrades have trickled in. To everyone who has been eager to provide time for the project, I appreciate each and every one of you more than you could know and while I do feel a little bad at times for not having clear and concise ways to get your labor into the project, I'm happy you're here. meow-hug One thing I'm going to do differently is to make sure if I'm asking for help I'm more clear about exactly what I'm looking for, how it fits into the project, and what my plan is to incorporate your work into the whole. Including everything everyone has already done, retroactively.

ily comrades. Talk to you soon trans-heart


heyyy friends! it's been a minute! screm-a

I don't have tech updates since the last post, although my oscilloscope did come in! I poked around on my board and got some really good insight that will fuel my debugging the next time I sit down for some real work. My goals for my next work session are the same as detailed in the previous post.

In the, what, 13 days since the last post, I have:

  • interviewed for and accepted an offer for a job that is much better than my current one
  • agreed to move a thousand miles away for it with three weeks notice
  • changed my HRT routine
  • my brake light came on, I decided to DIY it, and I found other broken parts inside to fix as well, in the car that I'm driving a thousand miles in two weeks
  • stalled on my taxes and had to cram them all in during this

so I'm, yeah! feeling good! blob-on-fire

I'm expecting to be situated first week of May and probably will have enough work done to get post #6 up second week of May. I'm not worried about dropping this project, this is not the kind of project I intend to throw in the work in progress bin - I was a month deep when I started posting and I have a month of posts on this project, the momentum is there and I will finish this one. But expect some silence from me while I bocchi-glitch

I love you all. Good things coming. I'm stressed but it's all positive changes and once I have stability I'll be better than I was before. meow-hug


cross-posted from: https://hexbear.net/post/2191451

somewhat disappointing post for the day but it happens vivian-shrug


Hey friends meow-melt

this week has been rough for this project, not gonna lie, I have a killer bug that I haven't solved yet (that I will likely solve as soon as I write all this out complaining about it, lmao) so I'm a little behind where I wanted to be. I also have a little bit of scope creep coming for me. Not a great week, but there was progress nonetheless. At least the good news is that there's no discernable hair regrowth in the one small area that I tested - it's only been a week or two, but it's reason for optimism!

Last Post

What I've been up to

Last time we spoke, I said I was gonna be designing and ordering the Lite Alpha 1. Sadly, I'm not there yet. I did implement fixes for all of the bugs mentioned in the previous post into the start of a Lite Alpha 1 schematic. Unfortunately, a lot of that was low hanging fruit. I have two more daunting challenges ahead of me before I can order boards and actually make a Lite Alpha 1. The first, which is really deeply killing me right now, is a bug, the second is a feature that I'm kind of deciding is necessary that I'll mention in new developments.

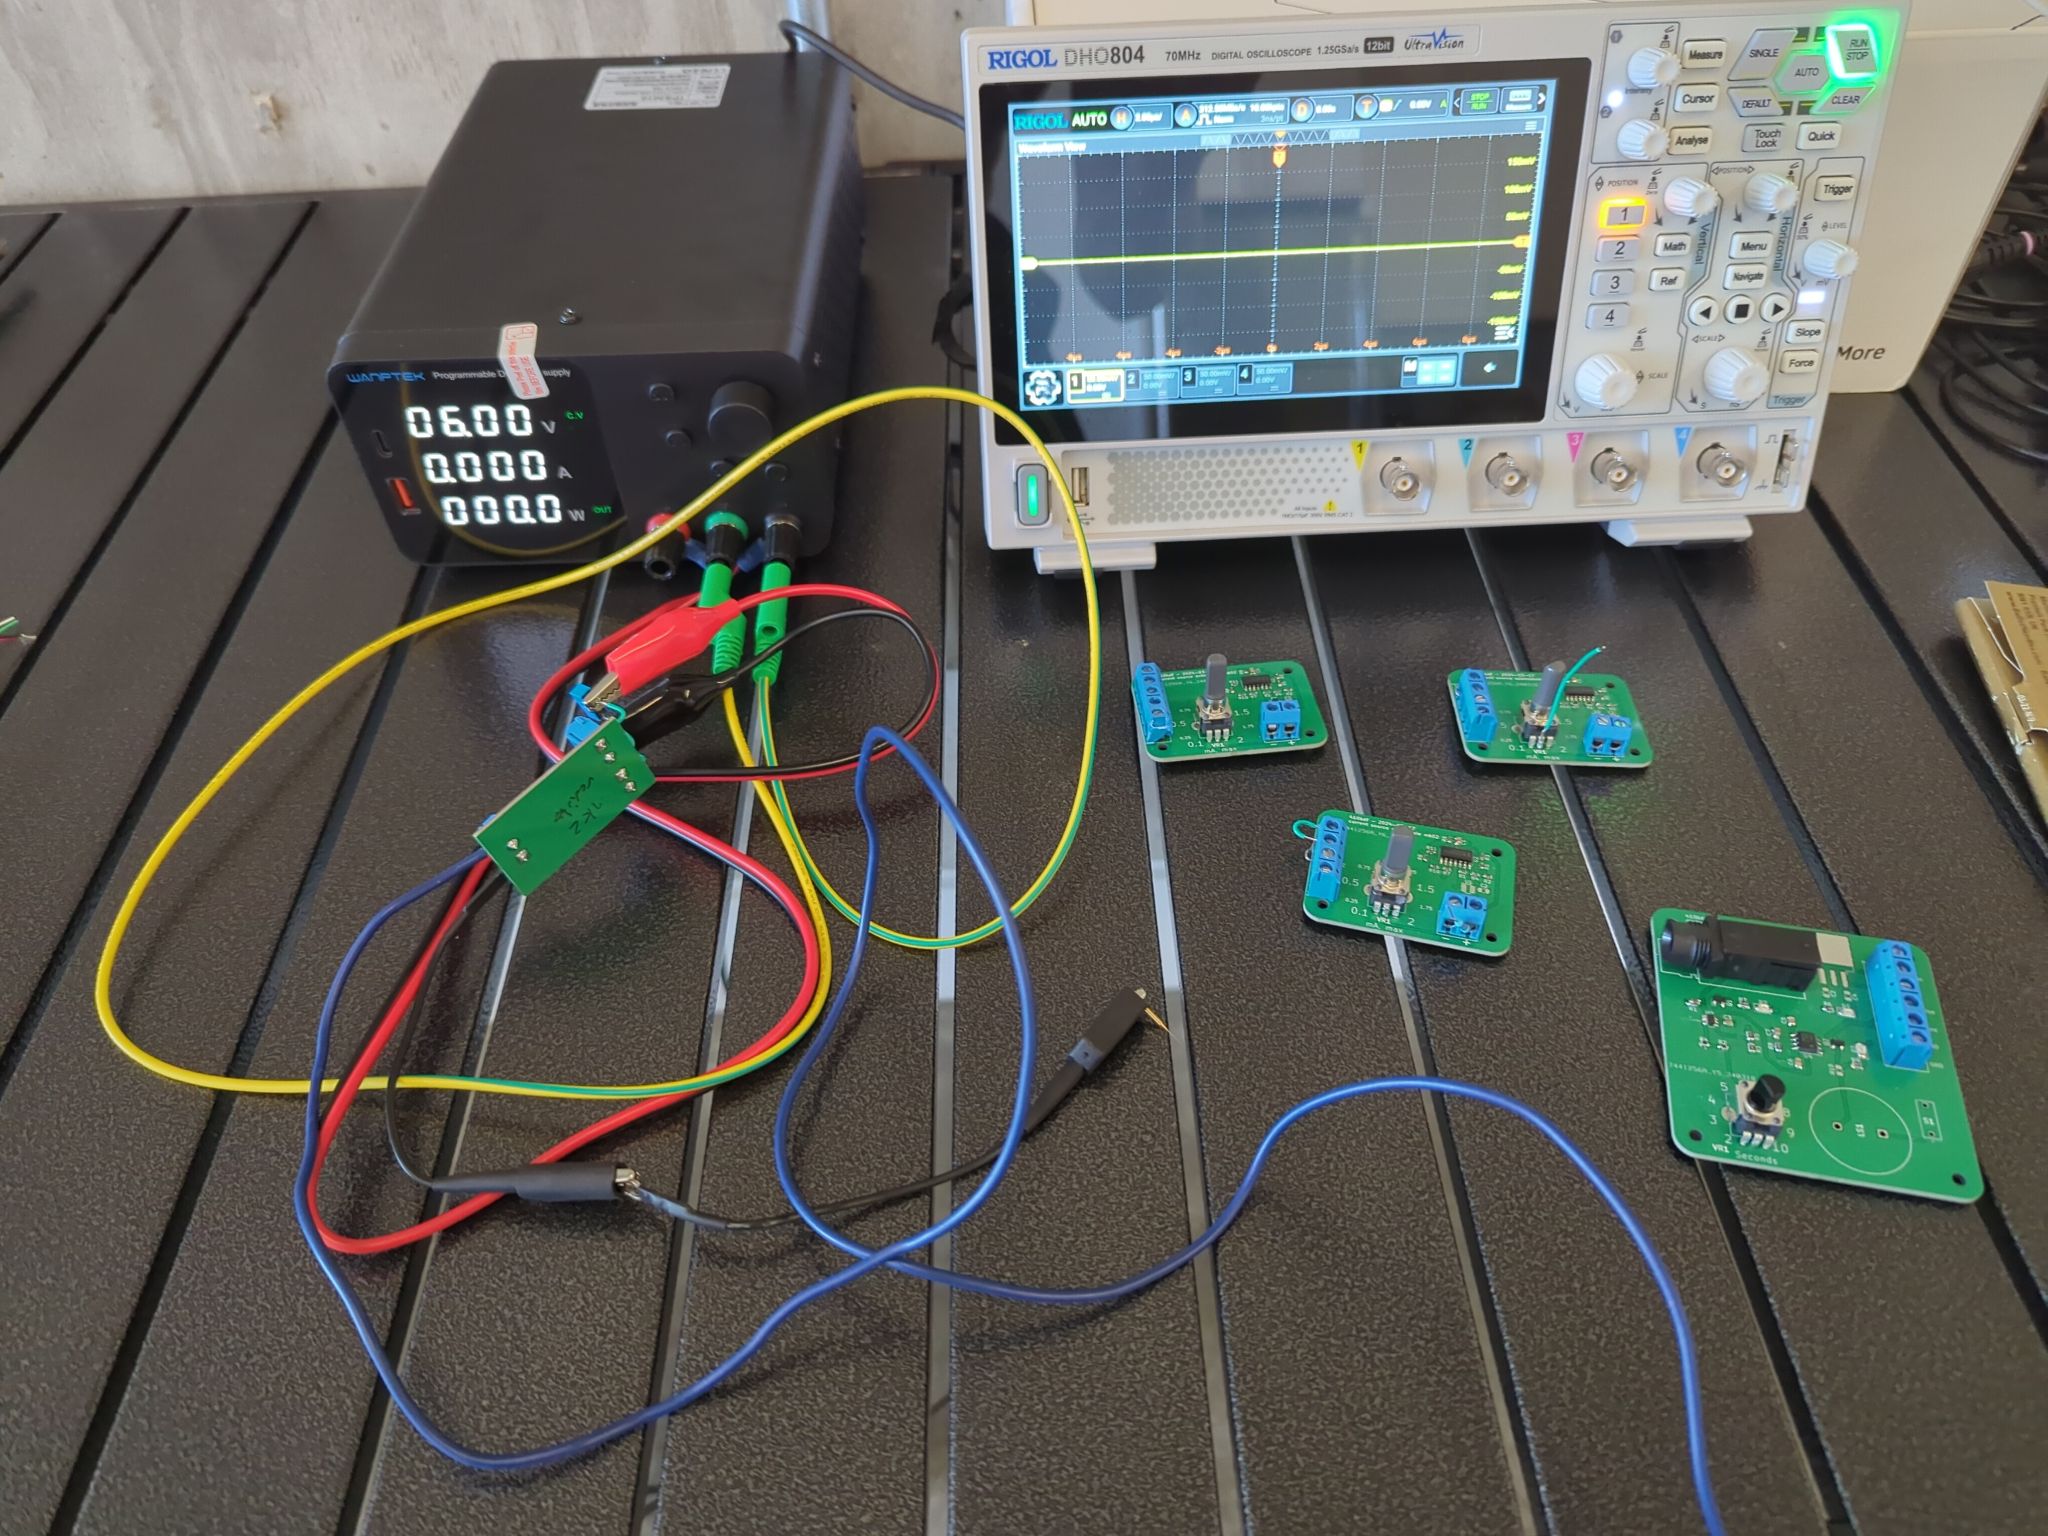
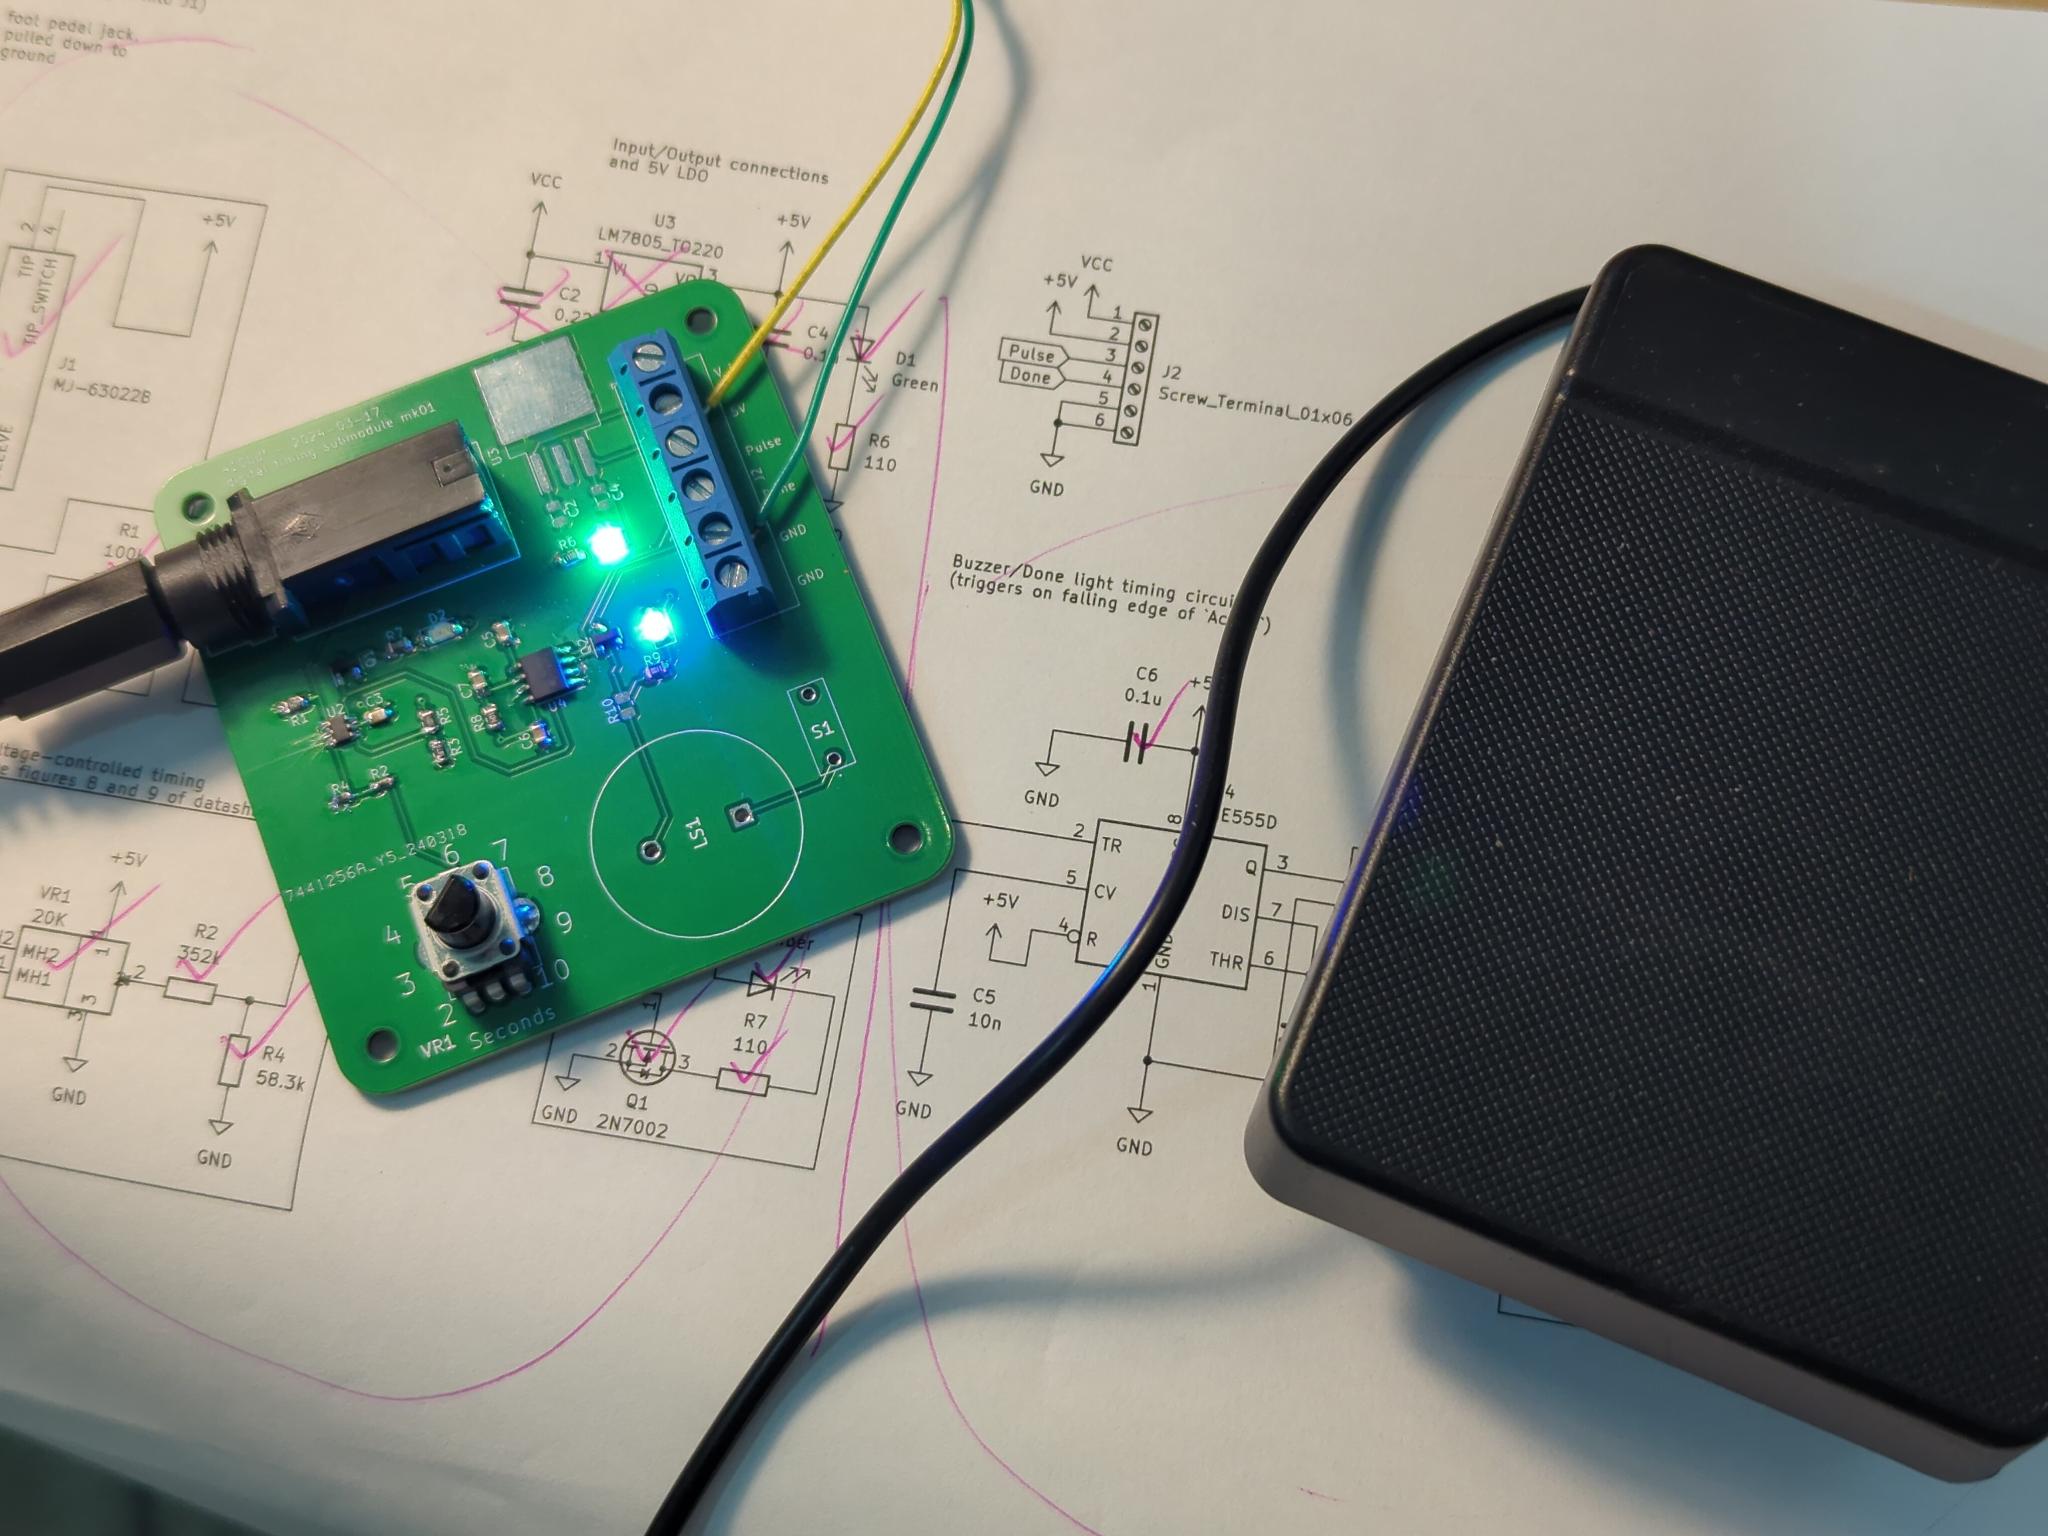
I wired the two boards from last time together to test as one unit, here's what it looks like:

Here's the bug behavior:

  • Power on the board, everything looks OK. Active light off, done/ready light on.
  • Put the probe in a follicle. No current draw.
  • Push the pedal. Active light on, done light off, current comes from the probe. Good!
  • Timer finishes, active light goes off, done light comes on, current doesn't stop flowing. Bad. Even after removing and reinserting the probe, current starts flowing again. Until you power cycle the board.
  • On paper, this sounds whack but very possible to debug, but crazily enough, I can't reproduce it with a 10K resistor instead of my body.

Next paragraph is kind of jargon-y word barf that I didn't bother to make explicit or clear or referenced to the design, sorry in advance, I partly just needed to complain, but: I'm worried it has something to do with the fact that the return line of the probe is technically not ground and instead a current sink floating just a little above ground. If that's an issue, then I need to idunno make a negative supply or something and I really really don't wanna. It could be a thousand other things too. My only big lead is that if I physically disconnect the Pulse line with that switch you see in the photo, it doesn't sink current any more, so it's probably something wrong with the digital timing board. The voltage appears to be 0 even with it connected, the light is off, and it's even tied down via the potentiometer on the current source board, not to mention the LTC6993 says it can sink current through the OUT pin so even if there is something driving it high it should get pulled low. The mechanism of action here is that the potentiometer that divides the voltage that goes into the current source input is driven directly by the pulse line. I'm completely lost. It doesn't help that I'm doing this all with nothing but a single multimeter to debug. I think I'm going to buy an oscilloscope for this. I've wanted one for like a decade now and this is as good of a reason as any. It delays things, but hopefully this will speed up all testing I do from here on out forever.

Oh, and I caught and fixed another easy bug - I noticed that every time I turned off my soldering iron, the board would trigger. Luckily I knew right away that that's a noise thing. I added a 1 uF capacitor filtering the pedal line to ground and I don't get false triggers any more. Cleaner pedal signal, one less source of false triggers. yay kirby-spin

New Developments

I've decided that if I go ahead with the design as it is now, operation will kind of be firing blind. The user has no way of knowing how much current or voltage is coming out. I really want to keep the Lite simple, but I don't think it's acceptable for the user to not know if current was even getting delivered through the hair follicle. So I think it's in order to add one more part to the design before making an Alpha to debug and iterate on. Basically, what I want to do is make a status light that goes on if you are delivering >90% (arbitrary and subject to change) of the current that the knob is actually set to so that the user can know if the device is working with each pulse. I'm lucky I put that current feedback instrumentation amplifier in the last design, I had a hunch it would be useful and now it is: all I need to do is compare the voltage on the input of the high-side current source with the measured current times some factor, probably done with another instrumentation amplifier on the middle leg of the potentiometer on the current sense board. If the current feedback is 90% or higher of where the set voltage has it set to be, the light comes on. It adds a few parts and some complexity, but in testing, I was finding that moving around, having a bad insertion, or any number of other things could make the current drop and deliver an incomplete hair kill, and without a light or an ammeter hooked up, the user has no way of knowing whether each pulse works, and an entire session could turn into wasted time. I hate to make things more complicated when I'm already having problems, but I think this one is necessary. kitty-cri

Outside of electronics, last time, @[email protected] mentioned that sourcehut has a site hosting feature - thank you lilypad! meow-hug You're so right and I set it up and put up a splash screen and I think this is a good solution! She also mentioned that printable manuals are probably a good idea - I 100% agree, my thoughts for this were to ensure that whatever site generator we use, should we make our own theme, we make sure that it's print-optimized. Static site generators usually have Markdown-based pages and that's also compatible with Pandoc, so it'll probably be pretty doable to get them over to LaTeX too for that beautiful, beautiful formatting. Good looking out rat-salute

https://sphynx.diy

@[email protected] also did a lot of good thinking about static site options in the comments last time - thank you as well trans-heart probably gonna link its post down below in the comments when we talk about how to make a site!

Also - shout-out to @[email protected] for their amazing work figuring out a probe design in the comments of the last post! I haven't started building one out myself yet but I have some of the parts on the way in the mail and it looks like their work will probably be the basis for a needle holder probe, something that's necessary before we can fully release a Lite. Thank you bestie kris-love

Next up

Obviously I need to fix my bug and implement my feature. Besides that, there's not much else to mention in electronics. It's still too early for enclosure stuff, and the electrical design is too much of a moving target to start trying to port to JLCPCB, so I just have to fight through this one. All other new developments outside of me bashing my head against these two new problems will be in both the site and the applicator probe.

Any ways to help?

I think it's time I opened up site development to interested parties? We're not in a rush but it's on the table! If anyone wants to mess with Jekyll/Hugo/something else and sourcehut's build system, I set up a repo to connect to it, so with the right configuration, we can have a build job generate with Jekyll or Hugo or something and automatically deploy. That's here: https://git.sr.ht/~_410bdf/sphynx-site I'll make a top level comment to aggregate people who want to work on that below! We can work out what static site generator we want to use together and then we can start getting it set up!

Also, 100% looking for ideas on things to test on my bug, if you're good at electronics debugging, throwing some test ideas at me would be greatly appreciated.


As always, stop by, hang out, say hi, ask questions, tell me what you've been up to, design review me, however you'd like to be involved is good by me! All the love and look out for my next post in a week or so! meow-hug


Hello, comrades! I'm mostly not sick any more! Sorry so much for the week plus since my last post, most of the time I spent in that timespan was doing other things while I waited for components to arrive (especially because there's stuff I forgot in the first order and had to make a second one screm-a). Components got here, I put everything together, and things... work more than they don't work spongebob-party

Last Post

What I've been up to

Behold:

The boards are in and I made them and they work trans-heart

This segment of the post is going to be dense and technical, so feel free to skim and ask questions if you feel lost and want to get caught up!

Both boards have minor bugs that I will be addressing in the next revision - the next revision being the Alpha 1 version of the Sphynx Lite. The bugs I have are as follows:

Current pump bugs:

  • The knob is wired backwards. fix: make the knob go forwards, or more specifically, switch pins 1 and 3 on VR1. Ez.
  • The knob doesn't have a zero offset - instead of 0.1 mA to 2 mA, it goes 0 mA to 2 mA. This is annoying; if you turn the knob all the way, the device won't do anything, you have to bump it a tiny bit. The solution is to put a resistor of roughly ~~11~~ ~~5.5~~ 1 kiloohms on the low-side leg of the potentiometer (exercise for the electronics-curious reader to figure out why! check the schematic from my previous post!). The wide tolerance on the potentiometer means there will be somewhat of a range on the actual minimum current, but it should be a pretty small variation, around 0.08 mA to 0.12 mA worst case variation. Since this error 1) gets stacked up with the error of the user's body being different from everyone else's, and 2) is only error on the low side, not on the high side, I'm deeming it tolerable.
  • Not a circuit bug per se, but I designed this around a INA350CDS, which has 50 times gain, and then I accidentally bought some INA350ABSes, which only have 20 times gain. This part is a new addition that uses R1 as a shunt for active current measurement. It works exactly as intended, just with 20 gain instead of 50 gain. This can be used for a lot of things, but particularly, an automatic shutoff of the board if the current draw ever goes above, say, 2.5 mA. More safety! However, this component has another problem, which is...
  • The INA350 is fucking impossible to solder angery All these new space saving packages are absolute nightmares for hand assembly. I didn't even need space savings, it was just a cheap instrumentation amplifier that worked nice. I think I might have to ditch it because it doesn't come in a usable size. The same thing can be done with a dual opamp and some bonus resistors, which is less than $0.50 and I already have them on the board.

Digital timing bugs:

  • Backwards knob again...
  • Ignoring backwards knob, the range, instead of being 2 seconds to 10 seconds like I expected, is actually 2 to 7.5ish seconds. I haven't actually figured out why on this yet - I think it's because of the relatively simpler resistor divider thing I did with R2/R4/VR1, and there's some other current path I haven't thought about yet through the potentiometer. Could be something else too. In any case, the move here is probably to do something more like in figures 8 and 9 of the LTC6993 datasheet with an opamp current sink and a potentiometer, and something less like what I did, which came from the unlabeled figure on the last page of the LTC6993 datasheet. Again, one more part, but opamps are pennies and I use them elsewhere, which drives the cost down further.
  • The LTC6993 is one of the microtiny packages too. This is a little worse than the other microtiny package in the INA350, in that I can just buy another inamp or an opamp for that one, but the LTC6993 is fairly unique and I can't just shop for another part that does the same thing. I'm not sure what to do about this. It's too late to add a microcontroller, but this timing issue just won't let up. I think the difficulty to solder this one might just be a thing to fix in the Lite 2. Technically, you need this level of coordination and fine motor skills to do the actual electrolysis hair removal anyways, and I was able to do it with nothing but an iron, a solder sucker, and a magnifying glass, so it's not impossible and anyone with even slightly better tools than me should be okay, but it's still a bummer. From now on, new rule, nothing smaller than a DFP package. If I get rid of the INA350 and this, then there's no more.
  • The done alert doesn't work. The intention was that LED D3 turns on and buzzer LS1 beeps for half a second when the current pulse is done, alerting the operator that it's time to move to the next hair. This circuit is everything connected to U4 in the schematic in my last post. Not only did I pick the wrong kind of buzzer (very easy fix I just need to shop better), but the whole timer sticks on forever instead of just flashing on for half a second. I didn't know this at the time, but if I were to read the damn datasheet, I would have seen on page 10 that: "Monostable operation is initiated when TRIG voltage falls below the trigger threshold. Once initiated, the sequence ends only if TRIG is high for at least 10 μs before the end of the timing interval." Basically, the 555 wants to see a super quick off/on to start the timer, and I'm just giving it an off with an indefinite delay after, causing the timer to stick on. I don't really know how I'm going to handle this to be honest - my current best guess is to make some kind of quick and cheap RC high pass filter thing hooked up to a transistor that turns a high to low edge into a high to low to high pulse. I'll have to breadboard or simulate it a little bit, but if I can make this work it's a very cheap fix to the problem.

I'll be fixing this list of issues and moving both circuits to a new united design with test points and jumpers this time (thank you @[email protected] trans-heart ) that will be, if it works, the first alpha version of the Lite. Progress!

I also cleaned up git - not sure if anyone has tried to pull down the repository and look at the boards yet, but if you have, it was broken - it should be fixed now, but you'll probably need to re-clone. If anyone tries this, let me know how it works!

New Developments

I bought a domain name! Meet sphynx.diy meow-melt

Currently empty, just points to the git repo, but you have to start somewhere - this is where I want to host blog posts like this one, the assembly guide, and the usage guide and resources in the future. I'm not going to be doing much with it immediately myself, but having this makes it so we can start working on an actual site! I was thinking GitHub pages for hosting with a cute Jekyll theme, or maybe readthedocs like mentioned last time - thoughts?

Also! I used the boards above to remove a couple square centimeters of hair as a proof of concept! It's only been a couple days but I'm optimistic - I tested by tugging on the hair with tweezers, observing it tightly connected to me by the follicle, applying about 10 units of lye per Figure 2 of this very helpful resource I found, and then after current application, pulling again, for the hair to slide out with no resistance, which is a very strong indicator that it worked! Stay posted to see if they stay gone or if I need more juice, 10 units of lye is on the very low side but I'm playing it safe.

Next up

I'll absolutely be fixing up the boards as mentioned above and making and designing an Lite Alpha 1.0 next! I don't want to suggest that this one be used on human beings, but once I make it, it might be fun to buy and assemble for research purposes? Probably not, maybe best to wait until I at least make it to a beta version, but in any case I'm excited for it! It's also not too early to get work on a manual started - this is something that I'm going to try to lean on community help for.

I'm also exploring JLCPCB assembly - it would be much better for accessibility if I could keep 100% to their parts catalog (plus I wouldn't feel bad about using microtiny packages any more), and for now I think I'm close, but I know that there's at least a potentiometer I use that isn't in their catalog.

Any ways to help?

There are starting to be more things to do! I'm kinda feeling like it might be time to start pulling in folks for web stuff! If anyone has GitHub sites or Jekyll experience, getting going on a place to host an assembly guide would be awesome! This is also something that should be doable even without this particular experience if you know web stuff, so don't feel intimidated - I think this is accessible with a bit of new learning for anyone with intermediate web knowledge.

Another thing I could totally use help with is BOM management - I have links for all the parts, but I don't have them linked anywhere and I don't have them automated, tallied up based on cost, in a convenient one click buy cart, or anything else like that - if anyone likes making bills of materials in KiCAD, let me know, that would be super helpful! In a similar vein, having an audit and maybe a port of my design to 100% JLCPCB catalog compliance would be extremely nice, if either of those things sound interesting to you, let me know!


As always, stop by, hang out, say hi, ask questions, tell me what you've been up to, design review me, however you'd like to be involved is good by me! All the love and I'll talk to you in a week or so! meow-hug


New electrolysis doohickey project development journal up! This one is pretty technical and terse but feel free to just come thru and say hi in the comments!

cross-posted from: https://hexbear.net/post/2085333

view more: next ›